WELCOME!

It is hard to believe that it was almost ten years ago I witnessed a CNC router in action for the very first time. I was fascinated and simply had to have one! Although I had been in the creative end of the three dimensional sign business for most of my life I didn't really know what I would do with one of these machines - but I just knew it could do fantastic stuff.

Along with the CNC router I discovered the wonderful material called Precision Board and the glues, primers and other companion products they offer. Since then we have gone through many tons of the material using it in most signs and projects we tackle. This journal will chronicle our many adventures both past, present and future. I'll talk from the perspective of someone who pushes these products to the creative limit on a daily basis. I'll be adding to the stories two or three times each week. -dan

Thursday, July 4, 2013

Whistle Punk Hollow Adventure Golf project done!


Yesterday, we put the finishing touches to Whistle Punk Hollow Adventure Golf. It was a good sized project that kept us busy for a little better than five months. Many of the components were designed in EnRoute, and machined from 30lb Precision Board on our MultiCam. This allowed us to produce a better product, and much faster than if we had done it all by hand.

Here's a virtual tour of the finished project.


Thanks to the extraordinary efforts of our crew, the project turned out fabulous, on time and on budget.

Now it is on to the next! Stay tuned...

-dan

More lights!


I've been busy for the last while on other projects but tonight I managed to squeeze in a few minutes on the mechanical fish project. Todays task was to hollow out the eye sockets, inside the hatch, gill and mouth areas of the fish. In each of these areas I inserted LED lights that would add a magical glow. Ping pong balls cut in half proved to be perfect solution for the eye balls as the blue lights glow through beautifully and with just the right intensity.


I still have to design and route the ramp from the door to submarine hatch but other than that the upper portions of piece are now ready for hand sculpting of the details and then paint. I can hardly wait!

There will still be some details on the bottom that need to be routed but that will have to wait until the upper portions are complete. I like to design on the go, making modifications and additions as necessary.

Stay tuned as the next series of posts (on this project) will bring it all together.

-dan

Tuesday, July 2, 2013

Fishing derby for all


Our little mechanical fish sign 'competition' is getting lots of interest. And I'm geting lots of emails and messages asking if others can play and if so what the rules are. The answer is YES!
It all started as a dare of sorts. Jamie Oxenham built a nice little sign for his own studio. Doug Haffner and I were sitting with Jamie at the workshop in Indiana and we commented how we liked his fish. Jokingly we also said we thought he could do better and that we knew we certainly could. The challenge was instantly on.
Every challenge needs a few 'rules' of course. Our signs needed to include the words 'The institute for study of mechanical marine life' and also a dimensional mechanical fish of some sort. Ideas needed to be original. A dealine was also set for Labor Day - September 2, 2013.
Since then there has been a flurry of exchanged emails, with plenty of friendly banter  and rib poking - all in good fun of course. The 'competition' is FIERCE. Who will win, how will things be judged, does any of this matter? The whole idea is to build a fun, creative piece and to push our own personal limits. The end result for all who participate is to have a cool display piece in our own studio/showroom at the end of it all. Doug, Jamie and I will be posting step by steps on our blogs with the purpose of sharing with others the various techniques we use.
I've posted a number of journal entries here and also on the other blogs I write which, as expected has gotten quite the response. Since the the start where the three of us sat down in Indiana and began this thing others have also joined the fishing expedition. Mechanical fish are now being designed and built by nine people I know of across Canada and the USA, and I'm sure a bunch more I don't. That's all good.
What is happening is exactly what I have long wished for. People are creating some pretty cool artworks and having fun and learning in the process. It sure beats working! I sincerely hope you and many many more join in.
There are going to be some very wonderful mechanical fish created from what I've seen so far. Yesterday, I recieved an email from Wray Basset today from Pennsylvania. His fish will be a crab. (well withing the 'rules' I would think) He sent a bunch of pictures of progress to date and it's looking great!
So if you are up for a little fun and want to create a mechanical fish of your own - well go ahead. Bring it on - just bring your 'A' game.  :)
-dan

Friday, June 28, 2013

How to hang a fish


The mechanical fish needed some substantial hangers to look convincing. I decided some hefty I-beams were the order of the day but they needed to be a little fancy of course. Some swoopy curves and some drilled holes would do the trick nicely in a steampunk, victorian sort of fashion.

The files were created in EnRoute using the drawing tools. I first created the basic shape and then used the offset line tool to create what would become the flange of the beam. I wanted a solid piece at the top end to put an eye hook into. On the bottom end I created a thick mounting block. The rectangle around the beam is for sizing purposes. The angled line at the top will serve to cut off the inside hollow.


I used the jigsaw tool to create a new vector, then deleted the original inside line as well as the angles line.


I then modified this line using the point edit tool to add a curve to the top. Some circle vectors would form the cutouts when I created the reliefs.


The bottom block was then made into a relief one inch tall.


The I-beam flange was made into a 0.55" tall relief


Then I created a 0.2" tall relief of the inside web of the beam.


All these reliefs were then merged highest with a background zero height relief.


I made four copies of the beam shape, flipping two because it would take one of each to make a beam. The file was then ready for tool pathing. I did a rough pass using a 3/8" bit and a 0.1" offset. A final pass with a 1.8" ball nose bit finished things off nicely. 


As quick as it took me to check my email and write one reply the MultiCam had done it's work. After cutting the columns to length and at the right angle I used a 5 minute epoxy to glue everything into place.


It's looking pretty spiffy already. There's still lots to do but the mechanical fish is coming along nicely. 

Stay tuned for a brilliant development tomorrow...

-dan

Thursday, June 27, 2013

More fishing adventure


Every submarine needs a dock and the Mechanical fish sub is no different. In fact this dock will be as imaginative as the fish itself.

The mechanical fish and dock use just about every trick in the book. As always, the vectors were first. Everything except the letters were created in EnRoute. I could have done the lettering in EnRoute as well but I've gotten used to doing it in Illustrator.

ALthough the file wasn't overly complex it did make me scratch my head a little as I worked it all out. The sign required that I routed it in six layers.There will be a fair amount of hand sculpting to finish things off. The layer for the lettering was first as everything else would relate to it. The lettering would be carved into the face while the rivets would be raised. The two pillars will feature hand made stone work. The first task was to build the vectors for each layer.


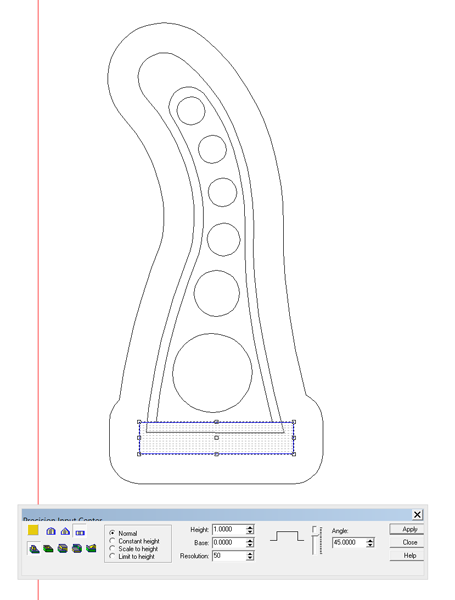
I created an offset to the base vector and first made a zero height relief from this new vector.


Then I started creating the submarine dock. I modified the relief by adding a half inch thick flat section.


 Then I raised the center section and kept the lettering sunken.


I also dropped the two portions under the lettering the same amount.


The columns which will eventually be stonework were created as separately and then merged highest with the base relief.


The rivets were domed up with a base of 0.1" This makes a pretty tall rivet at this scale but they will look great when I paint up this piece. This made the first layer ready for tool pathing and routing.


To maximise use of material I tucked the center door into the open space in the middle of the oval. The MultiCam made one rough pass with a 3/8" ball nose bit and a 50% overlap. then a final pass with a 1/8" ball nose bit.


The next file to get created was the bak piece which featured a deep textured dish in the middle. To create the dome I used the oval vector and the doming tool with a negative value. Then I added the SLOTCHES bitmap from the TEXTURE MAGIC Collection I used a value of 0.2" wish generated a good sized texture. I enlarged the bitmap so it was deep but subtle.


I had previously created an oval with a cutout by using the jigsaw tool. I created a zero height relief using this vector. Then I used it as the base relief and MERGED HIGHEST with the dished relief I had just created. This gave me the shape I needed for the piece.


I also created two middle layers to accommodate the hidden LED lighting modules. Two more upper layers were also added to the stone posts and one final layer to the bottom as well, totalling six layers. An oversize base is also in the works to finish things off.

Now the assembly, sculpting and painting can start at last. This is going to be fun!


We are still waiting for some indication from Jamie that he has even started (although he talking very big talk) He sent a picture of himself on Barney (his jet ski) most likely desperately looking for inspiration in the lake beside his house.


Doug has posted one sketch of what he says 'is an image that expresses his plan for Dan". 


Noella Cotnam, a talented and award winning sign maker from Ontario has joined our little fishing expedition. She has posted an image that shows promise... 


At this rate Noella is going to beat the two big talking boys without hardly even a scrap.

Well...  I guess I had better go do a little more work on the piece. The end of summer is coming fast.

-dan

Tuesday, June 25, 2013

It needs wings to fly


I jumped the gun on my last entry forgetting to first post the creation of the wing fins and the motor on each end. I used two functions in EnRoute to create the files...  sweep two rails and the revolve functions. As always I started with the vectors, created in EnRoute.


The wind portion of the file was a mesh created with the sweep two rails command. The top line is the profile I used. The bottom egg shaped motor was created with the revolve tool. Both meshes were them merged highest with a zero height relief.


One other part of the equation I didn't show earlier was how I sliced the fish sub relief in EnRoute. I was machining it from 1" thick Precision Board so I created four slices, then copied them, and flipped one set to create the second half of the sub.


Next up is the background/stand for the submarine. It's going to be just as cool as the sub. Stay tuned...

-dan

Sunday, June 23, 2013

Sub started


The thing I love most about our MultiCam is that I can set it up to run in a few minutes and then go away and do something else while the machine turns out the most wonderful pieces and do it more accurately and faster than I ever could.

Today I tool pathed the fish submarine and then worked on other things and even took a little time off and visited some friends. When I poked into the shop the pieces were cut perfectly and ready for gluing. I couldn't resist mixing up a little five minute epoxy and putting it together. I wasn't super fussy about how things went together for this is merely the base shape. I'll be applying and sculpting a detailed layer of sculpting epoxy over this shape. You can bet there will be lots of fun surprises as that process happens. But for now here's some pictures of the progress so far...


I've been getting a whole bunch of emails asking me to post links to Doug Haffner's blog and Jamie Oxenham's so they can see how the other subs are coming along. The truth is I'd be happy to do just that, and will hopefully soon, but sadly to date Jamie and Doug haven't made any progress or are simply afraid to post any pictures of their efforts. I'm not sure what is going on in their workshops but I am still hopeful they will work up the courage to participate in our little challenge. :) 

-dan