WELCOME!

It is hard to believe that it was almost ten years ago I witnessed a CNC router in action for the very first time. I was fascinated and simply had to have one! Although I had been in the creative end of the three dimensional sign business for most of my life I didn't really know what I would do with one of these machines - but I just knew it could do fantastic stuff.

Along with the CNC router I discovered the wonderful material called Precision Board and the glues, primers and other companion products they offer. Since then we have gone through many tons of the material using it in most signs and projects we tackle. This journal will chronicle our many adventures both past, present and future. I'll talk from the perspective of someone who pushes these products to the creative limit on a daily basis. I'll be adding to the stories two or three times each week. -dan

Wednesday, February 19, 2014

Taking a sign for a ride to town

The great news is that we finally moved the five large features out of our shop two days ago. That meant I could finally get the old compressor out to take it to the repair shop for a rebuild. It arrived back today and that means we can soon get back to routing the long list of backlogged projects once more.

Today, however was far too busy for any routing. Today we were placing the last of the marge pieces in their final home. The first was the top two pieces of the treehouse. The tee trunk has been in place for a number of weeks. Today we brought in a giant crane to lift the house and roof into position. It went smoothly.


The next two pieces were the center supports for the series of rope bridges that will connect these elements. This lift too went flawlessly.


One other piece we moved was the Carousel and Balloon Adventure signs. We loaded the sign onto my client's trailer. He was so excited about the sign he decided to take a detour to his favorite coffee shop. As he said later, "It was with great delight I took up six or seven parking spots - right in front! It didn't take long for a crowd to gather either!" 


It is always nice when a client appreciates our work!

-dan

Monday, February 10, 2014

Happy Horse Saloon sign - background

The Happy Horse Saloon has a false front with and arched top. The round sign will be attached inside the round portion in-between the two light boxes.


 The back of the Happy Horse Saloon sign wasn't much harder although it was critical that everything was done in a particular order to get the results I was looking for. I started with those  same vectors.


I started by creating a shallow domed relief. I started with half that and then looked in the front view to see how it looked. It needed a little more and eight degrees proved to be right.


I then added a 0.3" border around the letters. I would use this later. The center circle was made into a 2" tall flat relief. This is the thickness of 30lb Precision Board I will route the piece out of. The round barrel head will fasten to this circle.


I then imported the sandblasted wood bitmap texture from my TEXTURE MAGIC COLLECTION


Then I created new flat reliefs using the lettering border vectors.


This relief was then modified using the letter vectors.  I used the prismatic tool but limited the height. this created a 45 degree chamfer around the edges.


If you look close at the screen capture above you can see the lettering border disappears into the woodgrain where it is raised higher by the dome shape. To fix this I selected the lettering border reliefs and a new vector circle I made by offsetting outside edge of the sign. This acted as a mask to shape the lettering outline relief in a dome shape, the same as the sign.


I could then merge highest all of the lettering border reliefs to the base relief. At this point I decided to lose the horse shoes. They simply added clutter and weren't needed.


I then positioned the barrel relief  which I had earlier created to sit on top of the round sign base.


The file was now ready for tool patching and routing.


My router is still non-opertional until the new air compressor arrives. In the meantime I'll continue to create our needed files. Then well run it non-stop until we have all of the signs done. Stay tuned for more signs...

-dan

Sunday, February 9, 2014

Happy Horse Saloon - Barrel portion

The next sign in the long series for the Cultus Lake project is for the Happy Horse Saloon. I'll be posting it in two separate posts. It is to be round, layered and feature a fully dimensional cartoon horse head. The head will be hand sculpted. I created the basic vectors for the sign in Illustrator and then imported them into EnRoute. I scaled it up to the right size.


The routing file for this sign would be routed in two parts, each to be layered up separately and then layered and glued. The first routing file I created was the round barrel head in the centre. This vector file was created entirely in EnRoute.


I first created the rim of the barrel as a flat relief.

I then modified this relief by adding a shallow dome to the centre portion (not shown) and then modified the relief once more by adding a bitmap woodgrain.


Then I built separate flat reliefs of varying heights to form the barrel staves. I'll hand carve the woodgrain into them as it is faster than modelling it in the computer. If I were doing multiple copies of this sign it would be a different matter.


I also built a separate flat rectangular relief in the centre. This will be used to attach the horse's head.


I then merged highest with the base relief to finish the file.


Next time I will build the background piece for the sign. Stay tuned...

-dan

Tuesday, February 4, 2014

House featured in South Africa

Janis and I designed and built our new house for ourselves, to enjoy and be comfortable. It is also designed to showcase the things we are passionate about. Although there is still a lot of work to do to totally finish it off the house has garnered a lot of attention already. The latest was a feature in a South African architecture magazine.

I was interviewed late last year by a fellow from England who was writing some articles about how EnRoute Software was being used. He loved our house and thought it was worth a mention. That article was picked up by the magazine.


Monday, February 3, 2014

Imagine the fun of these deliveries!

The giant cactus with the vulture has been sitting in our driveway for quite some time, patiently waiting for the time to deliver. Today was finally the day.


Now imagine the fun of strapping this piece upright onto the trailer (so it doesn't get damaged) and then driving down the road.  As you can imagine I got plenty of second (and third) looks, lots of friendly waves, huge smiles and thumbs up at every turn.


The installation was flawless as per usual. The crew up at the lake knows their stuff when it comes to hooking up, lifting and sliding into position the most unusual of loads. THANKS!

-dan

Saturday, February 1, 2014

MAGIC WORKSHOPS OFFICIAL ANNOUNCEMENT

As much as I love to dream up wild projects and then build them, teaching others to do these things is also a great deal of fun. Since 2007 we have been hosting workshops and welcomed well over a hundred eager students from around the world including across Canada and the United States, (and Hawaii), Germany, Sweden, Holland, the Netherlands, Australia and New Zealand.
I've been getting many emails lately, asking about our workshops and when the next ones might be held. We are pleased to announce that we will be hosting two workshops in the fall of this year.
The first will be our SIGN MAGIC WORKSHOP which is to be held Friday-Sunday September 26, 27, 28, 2014. This workshop will cover a wide variety of subjects including design, marketing, creation of 3D routing files, a little sculpture and our painting techniques. For those interested bring your workclothes for this is a hands-on workshop.


The second workshop wil be our SCULPTURE MAGIC WORKSHOP which is to be held the following Friday-Sunday October 3, 4, 5, 2014. This workshop covers our methods of sculpting including the design, building of the armatures and the sculpting of fiberglass reinforced concrete and sculpting epoxy. This too is definitely a hands-on workshop. Students will get their hands dirty as they weld, mix concrete, sculpt and paint.


I'm looking forward to sharing as much as possible through the workshops!

-dan

Thursday, January 30, 2014

Building the Summit routing file

The next sign to be built for the Cultus Lake Adventure Park is the Summit Trading post.  Since we elevated the ground by eight feet and the trading post in on top of the hill (and inside the mountain) SUMMIT was the perfect name. It will feature a small copy of the mountain peak. The sign will be double sided with a fully dimensional sculpt inside.


As always we start with the vectors, this time done in Illustrator as I am familiar with the way the type is edited along the curve. This vector file was imputed into EnRoute and then enlarged to be the correct size.


M first step was to put an outline which we would use to create a raised border a little further along.


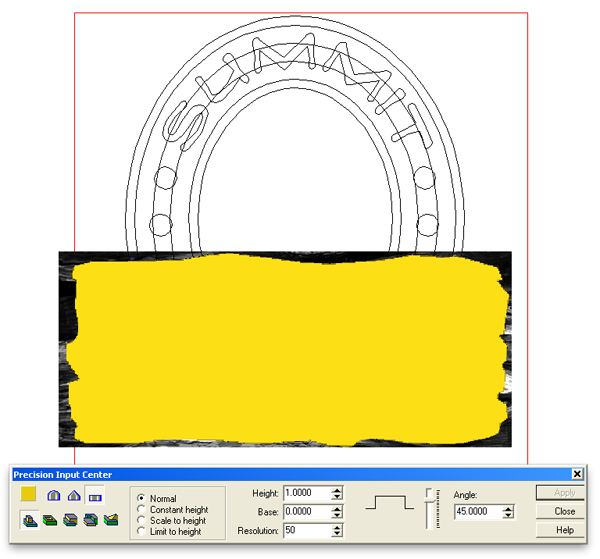
Then I imported the driftwood bitmap from the ROUTER MAGIC collection. I sized the bitmap, centered it and then traced a vector outline.


Then I created a flat relief using this vector.


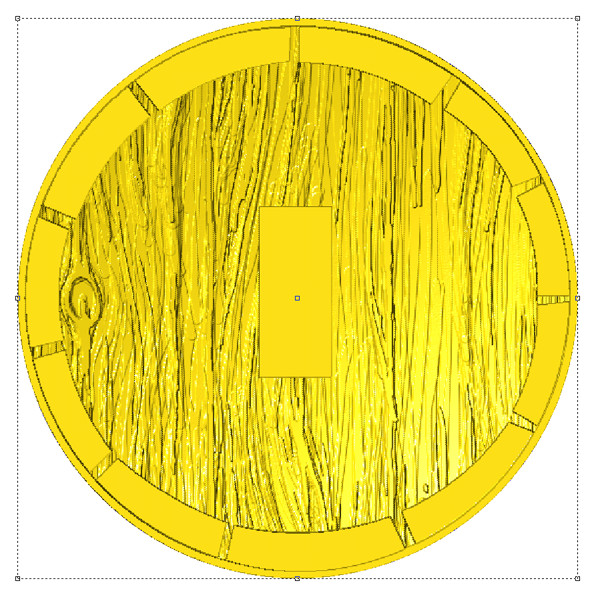
Next I applied the bitmap to the  relief using a value of 0.3" This means the blacks do nothing, the white raises by 0.3" and the grays do something in-between.


I then used the relief modeling tools to carve in some extra depth into the woodgrain. It took only a few seconds to get the effect I was after.


The oval was the next relief to be created. It was done as a flat relief.


The flat oval border relief was then modified by doming up the center with a raised base to give it a bit of an edge.


 I then copied the files, then flipped one (but not the lettering) This would allow me to glue the two signs back to back and have them match perfectly.


The bottom lettering border was then created as a separate flat relief. (in both copies of the sign. ) I then selected the oval and driftwood reliefs and combined them to form one relief.


I then positioned these new lettering border reliefs and merged them highest with the base reliefs.


Then I modified the base relief by adding the lettering. I used the bevel tool with a base height. This chamfered the corners of the letters perfectly.


Lastly I used the dome tool to modify the base relief using the SUMMIT letter and circle vectors.


As easy as that we had a routing file ready to tool path and send to the MultiCam.


My big compressor packed it in yesterday. It had been acting weird of late and I decided I would get a new one and then rebuild the old as a standby. Luckily I had already placed an order for a new one last week.  It will be a while before the new one arrives so I will have to wait to route these pieces. In the mean time I have plenty of other things to do Stay tuned...

-dan