WELCOME!

It is hard to believe that it was almost ten years ago I witnessed a CNC router in action for the very first time. I was fascinated and simply had to have one! Although I had been in the creative end of the three dimensional sign business for most of my life I didn't really know what I would do with one of these machines - but I just knew it could do fantastic stuff.

Along with the CNC router I discovered the wonderful material called Precision Board and the glues, primers and other companion products they offer. Since then we have gone through many tons of the material using it in most signs and projects we tackle. This journal will chronicle our many adventures both past, present and future. I'll talk from the perspective of someone who pushes these products to the creative limit on a daily basis. I'll be adding to the stories two or three times each week. -dan

Monday, July 31, 2017

Dayna's tree

We received a request for a very special sign recently. A family had lost their four year old daughter to cancer and wanted a sign for a park they were dedicating to Dayna. We came up with the idea of a tree. Dayna loved ladybugs and so four ladybugs will be hiding on the tree for other children to find. A small fairy door will be tucked between the roots.


With the design approved we started in on the build. As with many of our projects there will be a variety of materials used. The base is cut from a sheet of half inch thick steel. The file was designed in EnRoute and the MultiCam CNC Plasma made short work of this part of the project.


Then it was time for some sturdy structural steel. The tree frame will get a sturdy lifting point to handle the loading and placing on site. It has to be plenty strong as the tree will travel about two thousand miles by truck.


Once the basic structural frame was donee started welding up the pencil rod armature and tying on the galvanized lath. The double sided sign was designed in EnRoute a d routed on our MultiCam from three layers of 30 lb Precision Board. The steel structure is embedded in the centre layer of the sign. Once I had located the sign we can now continue building the top portion of the tree armature.


Today I designed the cutting files (in EnRoute) for the steel leaves. I then formed them and welded in half in steel rods for the stems. Once we finish grinding them we will send them off to the powder coaters.


Sunday, July 30, 2017

Metalwork fun

More than a dozen years ago we decided to build a fifteen inch gauge railroad around our yard. Every grampa should have a model train to share with their grand kids... and mine would be big enough to ride in. I started work on the project before our fist grandchild was born. There was a small engine, some railcars and an inspection vehicle. This little vehicle would be gas powered.

I designed up the car which resembled a narrow model T with a side car. I wanted something really different and so it had only three wheels - which seemed like a great idea at the time. The truth is I actually outsmarted myself. When I finally got it rolling and tested it on the track which we had laid down the driveway  it worked great - until we came to the first corner. Then it derailed. It was time to go back to the drawing board! The project languished for many years as we tackled a thousand other projects.

Saturday, July 29, 2017

Painting the train

As I finished the models Becke began the painting. She started with the elephant engine. With large detailed models the painting process is painstaking, taking almost as long as a full sized piece. The base colours are layered on, then the glazes. All of it is done with fine artist's brushes. We still have a couple of day's work to do before they are done but a circus train never looked better!


Sculpting fun!

I used Abracadabra Sculpting epoxy to sculpt the animal bodies of the train. Steel rods were used as reinforcement. The shapes were first bulked out and allowed to harden. Then I went back over the pieces adding detail as necessary. I did the sculpts over a period of three days.


Building the train car files


The mechanical circus animal cars all shared the same routing file. I would sculpt the animal features on later by hand.


The routing files were created in EnRoute using the drawing tools.


I used the dome tool to create the first relief which formed the car body.


I then created a zero height relief which will be used to trim off the extra on the bottom of the car body.


I did the trimming by selecting the body relief and then merging lowest with the zero height relief.


I then used the slice tool to get rid of the lower part.


I then created two new reliefs - one for the deck of the train car and one the lower part under it. These new reliefs were combined with the body relief.
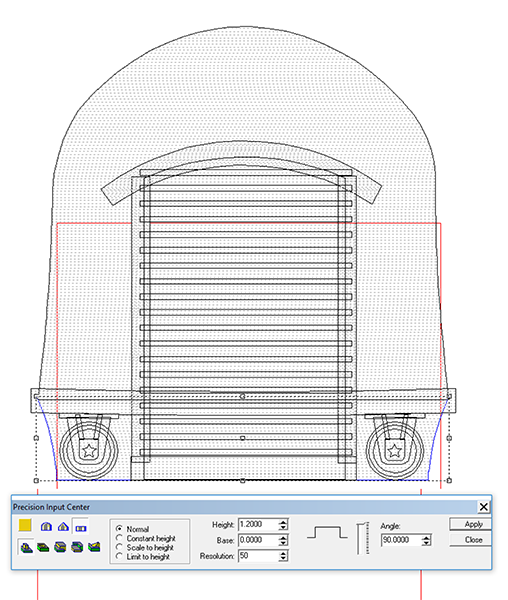


I then duplicated the new combined relief so I could make a front (with a door) and back (with a window) of the car.

I drew the vectors for the window including the bars in the window.


Using the warp tool I bent them inwards.


Too make the window I created a flat relief.


I then modified this relief by using the dome tool to make the bars.


I then merged LOWEST to sink the window into the car.


The easiest way to create the wheels was so do the various components as separate reliefs. I started with the wheels. I first created a flat relief using the outermost circle. This formed the flange of the train wheel.


This relief was then modified by raising the centre portion to form the tire of the wheel.

I then dressed the centre using the subtract command.


The mounting bracket was created as a flat relief.


The mounting flange and gussets were next, also created as flat reliefs.


The journal box was next - also as a flat relief. The star was added by modifying this relief.


All of these components were then MERGED HGHEST to create the wheel sets on the cars.


While I did the car concepts with the doors open I decided it would be much easier to build the models with a rollup door (in the closed position. They were pretty easy to build and add to the car. The key was to do things in the right order.

First I created a flat relief of the door. This relief was then modified using the dome tool to add the round ridges to the front.


The door jambs and eyebrow were created as separate reliefs.


Because the door was lower than the body of the car but higher than the chassis I MERGED the reliefs using the REPLACE function.


The door jambs, floor and eyebrow were MERGED HIGHEST with the car relief.


This made the car ready to route.