WELCOME!

It is hard to believe that it was almost ten years ago I witnessed a CNC router in action for the very first time. I was fascinated and simply had to have one! Although I had been in the creative end of the three dimensional sign business for most of my life I didn't really know what I would do with one of these machines - but I just knew it could do fantastic stuff.

Along with the CNC router I discovered the wonderful material called Precision Board and the glues, primers and other companion products they offer. Since then we have gone through many tons of the material using it in most signs and projects we tackle. This journal will chronicle our many adventures both past, present and future. I'll talk from the perspective of someone who pushes these products to the creative limit on a daily basis. I'll be adding to the stories two or three times each week. -dan

Wednesday, January 30, 2013

Building a train - Part eight


In the old days highly skilled woodworkers would painstakingly carve patterns for castings. Years ago I was in such a wood shop and marveled at the detailed and intricate work I saw. These patterns would then be sand cast to produce the pieces they needed. A steam train would have hundreds and hundreds of castings which would then be assembled.

As we create our train we are seeking to replicate this work, but instead of doing everything by hand we are using modern software and the 'castings' are routed on the MultiCam from sheets of Precision Board. The stack of cut pieces is growing fast!


Although perfect in every detail we still have to make the cut pieces of Precision Board look like cast iron, and 100 year old cast iron at that. It's easy with the special paint we use. After two coats of the dark grey 'iron' paint is applied I then spray it with a mild oxidizing solution and in a mater of minutes it forms real rust.  In an instant the pieces look authentic and also incredibly heavy.


Stay tuned as we assemble and finish the rest of the pieces.

-dan

Tuesday, January 29, 2013

Building a train - Part seven


The train is coming along nicely. The bulk of the frame, tank and cab is welded steel.  Now it is time to fire up the MultiCam once more and do the many details we need.


Today's project was the steam cylinders that power the geared engine. This kind of complex shape is fun to create in EnRoute. I first had to build the vectors I would require for each relief. The reliefs would mostly be built separately and then merged after being nudged vertically into position. We would use a variety of procedures for the task.


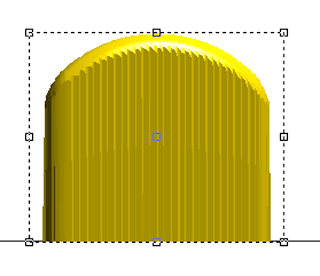
For the top of the cylinders I created meshes using the revolve tool. I then duplicated the mesh before merging it to a zero height relief.


The valve box was built as a separate relief as were the end caps. These were nudged into position (relative to the cylinders) Then I modified the valve box relief by adding the oblong shape and the rivets.


Then I created a zero height relief and merged highest, everything to it.


Using the slice tool I cut off the zero height relief.


The connecting rod covers were the next task. First I created a flat relief.


To add slope to the flat reliefs I used the sweep two rails tool to create a slope mesh. I merged this to the flat relief by adding to.


Then I created the bracing flanges (also a flat relief.)  These and everything else was nudged vertically (in the front and side views) until everything looked good. Then I created a zero height relief Everything was once again merged highest to this flat relief. Using the slice tool removed the flat relief when I was done.


Next I added the rivets by modifying the base relief.


The bottom bits were then built as separate reliefs, also nudged into position vertically and then merged highest with a zero height relief.


Lastly I sliced the assembly into three layers (to fit in 1.5" thick Precision Board) then tool pathed the file and sent it to my MultiCam.


The file was finished just at quitting time today. I'll document the assembly tomorrow and show how it all fits together. Stay tuned...

-dan

Tuesday, January 22, 2013

Building a train - Part six


It is always fun to dream up fanciful ideas but when it comes time to build these ideas a whole different logic takes over. We build for the real world where things have to be insanely strong. No failures are allowed.

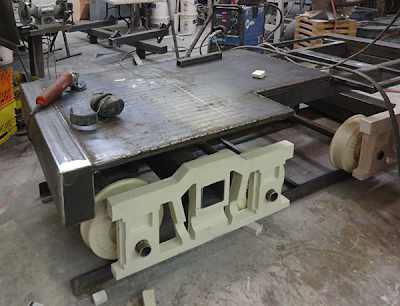
Because Precision Board and other similar high density urethane boards have little structural strength we have to figure out ways to hide our structure in or behind the things we build. While we want the train to look like it is supported by the wheels and side bolsters the truth is a sturdy, welded steel frame will really be holding everything up.

I started with some heavy 3" X 3" angle iron that will sit on top of the ties. a routed Precision Board rail will hide this when we are done. 2" x 2" square tubing runs up behind the wheels vertically to the frame. The wheels and bolsters will be there for show alone.


Once I had a fully supported frame I could continue the fabricating the the train. A heavy stel deck was the next order of business.


Just before quitting time tonight I managed to cut the boiler pipes to length and then welded them together. Tomorrow I'll hoist them onto the train deck and begin the cab fabrication.


Tomorrow it will begin to look like a train. Stay tuned...

-dan

Monday, January 21, 2013

Building a train - Part five


It is great fun to design and build a project like the train. A few of the components can be sourced but the bulk of the train will have to be custom built. Today I placed the order for the bulk of the steel I'll use for the project. This will be cut to length and then welded together in their rightful place. For the boiler, steam domes and smoke stacks I needed some heavy duty and large pipes. The thing is I didn't need long lengths and so went shopping in the scrap bins of the local steel fabricators. It didn't take long to source the perfect sized pieces I required.


While I was in town shopping the MultiCam was busy carving the truck sides that would cradle the wheels and 'support' the train. They were whittled from two inch thick 30 lb Precision Board. The pieces that will be fastened on to provide all the detail will be routed tomorrow.


It won't be long until this thing looks like a train. Stay tuned...

-dan

Friday, January 18, 2013

Hackensack Sign Magic Workshop a success!


The Hackensack Sign Magic Workshop is now history. It was a great workshop!  This time around EJ Nordurft from EnRoute did a wonderful job in presenting the technical side of the program. Kellie Miller from Coastal Enterprises helped us out by showing us the various ways we could use Precision Board and the companion products. And the folks from MultiCam East were wonderful hosts for the workshop. Altogether it made my job real easy and I could concentrate on the creative aspects of how we design and craft our signs and projects.


For three days we shared ideas, learned new techniques and put our hands to making signs in whole new ways. It was worthwhile and FUN!

I want to express a HUGE THANK YOU to all who participated and supported us in this opportunity.

-dan

Monday, January 14, 2013

Ready for the Sign Magic Workshop in Hackensack NJ


We spent the day making sure everything is ready for the Sign Magic Workshop that begins tomorrow morning - bright and early. The tables are set up, samples ready, video equipment all tested and ready. I think we are almost there.


EJ from EnRoute is here and ready to go. I hear Kellie Miller from Precision Board has arrived as well. This is going to be a fun time!

-dan

Building a train - part four


Some of the truck components were built as separate components. they will be routed separately and them assembled to be part of the log car truck. These spring boxes were fun to build.

The vectors were created entirely in EnRoute.


I created the springs first using the dome tool.


I then modified these spring reliefs using the pill shaped vector and the dome tool.


I created the flat relief of the spring box and then added the rivets using the dome tool.


I created a shallow flat relief to form a back for the box. It was built separately.


 Then I rendered the pieces the spring was too high and protruded from the box.


I would remedy this in the front view by nudging the spring downwards until it was within the box.


I also built a 'bowl around the whole works. Everything would be merged to this bowl.


Four of these boxes would be routed for the log car trucks.


These will be routed along with all of the other pieces for the trucks and then assembled with the wheels done previously. Here's a pic of the log car wheels, straight from the router.


Stay tuned for more progress...

-dan

Saturday, January 12, 2013

Wainscot up and trim started


On January 1 I posted the text pieces of front window trim with the butterfly inserts. Since then I modified that test slightly and ran a second version of the test - just to make sure everyone liked the design. We agreed and then it was on to production for the actual windows.  I first carefully measured the windows for the trim. I knew it would be eight inches wide with a four inch butterfly insert. The top portion of the circle over the windows will be a giant crown molding that arches over the window and then goes around the room level at the eight foot level. LED lighting will be hidden into the top of it so it shines upward onto the ceiling. Making that giant crown molding still has me scratching my head.

But these were the starting vectors for the window - all created in EnRoute at actual size. The box indicates the bottom of the window frame.


I lengthened each piece to allow for slight variations that are bound to appear in the actual construction. Each piece will be trimmed to length by the finish carpenters The arch will be used to construct the crown molding. Like I did in the samples I crated back on New Year's day the butterflies were randomly placed through the middle panels and then I built the layered relief.


The pieces were cut from 30 lb Precision Board on the MultiCam. I still have to cut the upper pieces of the window trim. And identical set will be cut for the dining room windows as well.


I can hardly wait to see them fastened in place. It should look pretty cool! Here's a shot of the living room as it appeared tonight with the wainscot installed save for the top rail.


Stay tuned for more progress...

-dan