WELCOME!

It is hard to believe that it was almost ten years ago I witnessed a CNC router in action for the very first time. I was fascinated and simply had to have one! Although I had been in the creative end of the three dimensional sign business for most of my life I didn't really know what I would do with one of these machines - but I just knew it could do fantastic stuff.

Along with the CNC router I discovered the wonderful material called Precision Board and the glues, primers and other companion products they offer. Since then we have gone through many tons of the material using it in most signs and projects we tackle. This journal will chronicle our many adventures both past, present and future. I'll talk from the perspective of someone who pushes these products to the creative limit on a daily basis. I'll be adding to the stories two or three times each week. -dan

Tuesday, July 30, 2013

Workshop gear - part one


At our last workshop one of our attendees really fell in love with our workshop door signs. He asked me for the file. Sadly it is long since gone but I offered to create another and post it here on the blog. The original sign was obviously inspired by the movie 'Robots' which was a little more current at the time.


I created the danger lettering vectors in Illustrator as I am used to the way it handles lettering. This file was imported into EnRoute.


The rectangles were built using the rounded corners mode. To create the teeth of the gear I used the multiplier tool, checking the appropriate boxes to get the gears to wrap around the circle and align correctly.


The teeth were then merged with the circle.


I then used the chamfer vector tool to round off both the inside and outside of the  gear teeth.


Lastly I added the rivets to the inside of the rectangular frame.


 Next time I'll be building the custom tool and gear letters. Stay tuned...

-dan

Monday, July 29, 2013

Outside trim


Last fall I routed a whole bunch of outside trim for the house but as the cooler weather of the season set in we tucked it away and concentrated instead on the inside of the house. Now, with the inside largely complete we are turning out attention once again to the outside.

The trim features layered heart insets and is painted with base coats and three colored glazes. It was designed in EnRoute of course and routed from 30 lb Precision Board on our MultiCam.


It will take the rest of the week to finish off the painting of the existing trim. Then, as we install it I will measure up, design and route the trim that goes in between.


I look forward to seeing the house will all of the final trim installed!

Stay tuned...

-dan

Monday, July 22, 2013

To Hells' Gate and back


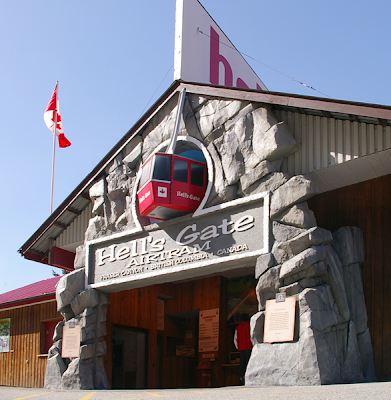
Today my grand daughter and I visited Hell's Gate Airtram, an attraction we built a large piece for many years ago. As we visited it brought back many memories.


Almost eight years ago now we bought our first MultiCam Router. I remember well the overwhelming feeling of complexity of both EnRoute and the whole idea of operating such a complicated piece of machinery. It was daunting to say the least.

I'm not at all gifted in computers or programs and in fact quite the opposite. But I was determined I could do this thing. I spent the first three months of owning our MultiCam just making samples and learning the ins and outs of EnRoute. To this point I didn't know what a vector was, had never operated a computer controlled machine of any type and had always done things by hand - with the help of a large crew. Luckily I had the help and support of some great people including our MultiCam dealer and the folks at EnRoute. In our shop I had the help of Phoenix Bermudez, my son-in-law.  He knew computers backwards and forwards and he was in charge of running the machine. I sat in my studio and banged away at the computer, doing my best to figure out the program and how to build three dimensional files. The only thing I really knew is what I was trying to achieve and not how to get there.

We started small with plenty of samples. Along the way we made plenty of mistakes and filled the dumpster with plenty of scraps. Eventually we were ready for our fist paying project. It was the proscenium for Hell's Gate Airtram. We would rely on many of our past skills for the project as well as incorporate the new ones. I welded up a large structural frame and Phoenix sculpted some very fine looking rock work. The piece was so large it had to be built in three sections and wasn't assembled until we got it onsite. We would rely on the MultiCam CNC router for the main lettering and the tram itself, both made from 30 lb Precision Board.


It's not often we use vinyl in our shop but occasionally there is the need.


Each piece was large and barely cleared the doors of our shop


The sign was transported without a scratch and fit perfectly onsite.


I love it when a plan comes together! What a great adventure it has been!

-dan

Thursday, July 18, 2013

Looks like a fancy hubcap


For such a small and seemingly simple piece the medallion for the Mechanical fish involved lots of steps and procedures. It also meant that I would need a 1/16" ballnose bit - something I don't use very often.

The bulk of the file, save for the scroll lettering was done in EnRoute Pro. Each point for the compass star would be built individually as things turn out better that way.


Once all of my guide lines were eliminated the vectors I needed for my reliefs were much easier to see. 


With the point reliefs created it was time to start on the center ring of the compass. I built the ring and center dome separately.


Then I added an upper case 'D' to the centre. Before I created the 'D' relief I first did an offset so the thing lined of the letter were a little beefier.


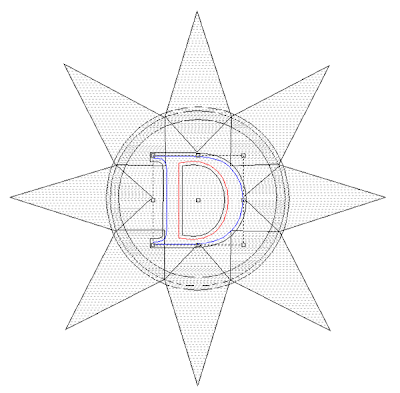
I was no happy with the compass and it was time to make the background gear and circle reliefs. I used the star drawing tool to create an eight pointed star. Then I used the inner circle to trim the inside points. The outside points were trimmed using the jigsaw cutting tool.


I built up the relief in sequence, adding rivets as a second step.


I wanted a gear with a bevelled edge and so I used the limit to height command to do this for me.


Then I added a little texture with a bitmap from the TEXTURE MAGIC collection.


Then everything was positioned vertically and merged highest to form my final relief.


Building and adding the scroll was the final step. I did the lettering and basic lines for the scroll in Illustrator, then imported them into EnRoute.

I positioned and sized the scroll over the previous relief, then built the final scroll and the underlying folds. These were then made into flat reliefs of varying heights. Once all of the scroll bits were built I combined them to form one relief.


When I hit render I had what I was looking for but it needed to be arched to come over the gear and star. I would use an oval vector to modify the scroll relief. It took a bit of experimentation to get what I was looking for.


The last step was to sink in the lettering.

 The name plate was then sent off to the MultiCam for routing from 1.5" thick 30 lb Precision Board.


The name plaque will fit right in with the whole piece as I sculpt it in. I'll be adding some barnacles and sea life to add a little more theme and make the base part of the overall sculpture. Stay tuned...

-dan

Wednesday, July 17, 2013

Finally an idea I like


Designing projects, especially one for myself can be challenging at times. When it's for me I tend to second guess myself more. I've been trying to come up with a medallion on the frame under the mechanical fish for some time. Over the last days I've done numerous sketches and a lot of research. Finally I just buckled down, determined to come up with something cool. It took four pages of scribbles in my sketchbook before the idea came together.

The design had to be highly decorative and yet not overpower the fish above. Finally I settled on five elements to the design. A riveted ring tied the design to the oval around the fish. A gear signified the mechanical theme. A compass rose made it nautical. The scroll provided a place for the shipyard name. And a 'D' plopped in the middle was a fun way to sign it (this being a 'D-CLASS' vessel and all.

The drawing below is the ten minute scribble - right out of my sketchbook, done with a ballpoint pen. It would make a fine tattoo on the captain's arm I'm sure.


As always it will be refined and altered as necessary as I build the 3D files in EnRoute and Illustrator. Once I'm done routing  hand work and sculpting will embellish and refine it even more. I look forward to the process of bringing this idea to life. 

Stay tuned...

-dan

Tuesday, July 16, 2013

Grand entry


Something as cool as a mechanical fish submarine needs a dock with a grand entry system. A drawbridge is just the ticket. Today I added the hinges and mounting plates for the chains (yet to be added) The rock work also was applied today. The key to finding the time to accomplish a project like this is to do a little each day. It's a great reward at the end of the day. The 'D' in the 'cast iron' drawbridge is to signify the class of submarine I am modeling - the legendary D-CLASS submersible. More to come on that later.


Tomorrow this will be ready for paint and then final assembly. Stay tuned...

-dan
Monday, July 15, 2013

Rockin'


This week is one of sadness for our family as we lost my father-in-law after a long and hard fight against cancer. Spend time with those you love while they are with you. Tell them you love them often.

A little work was done in the shop but only in small bits and pieces. The mechanical fish got a little attention in-between all the other things. I finished the sculpting of the fish's riveted skin and couldn't resist putting on the first of many coats of paint..


Next up was the rock work on the dock pillars. I used Abracadabra sculpting epoxy to form smaller rocks at the top and slightly larger ones as I worked my way down. This is a form of forced perspective to make the pillars appear taller than they really are. The larger stones also give weight to the bottom of the wall and just make it look right.


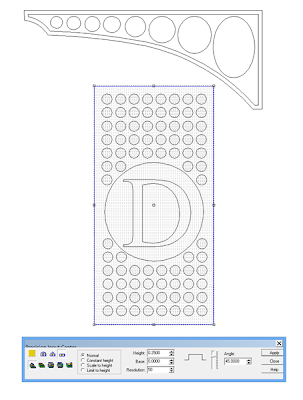
The ramp to the fish was the next order of business. I built the files entirely in EnRoute Pro. To keep things simple and easy to track I built everything separately and then used the merge commands to make the final relief. The holes in the floor grate were first as zero height reliefs.


Then came the deck plate as a 0.25" thick flat relief. The circle surrounding the 'D' was then created by using the subtract from relief command.


Then I created a half inch thick flat relief for the side beams.


The center portion was subtracted from this relief 0.30". The oval cutouts were created as separate zero height reliefs.


The ovals were then MERGED LOWEST to create the cutouts in the beam.


As a last step I also MERGED LOWEST on the floor grate relief to create the holes.


The small pieces didn't take long to route. I glued them up with a two part (five minute cure time) epoxy. One more piece of the puzzle is in place.


Later I'll add some faux hinges to the top and some chains with a counter balance dead weight on each side. The door handle is also to come along with a few other details. It won't be long until this section is ready for final paint and assembly. Stay tuned...

-dan

Monday, July 8, 2013

This thing has TEETH


The new house has been dominating my working schedule in the last days, mainly laying floor tile. The good news is there are only four or five more days of work until that task is behind me.

We keep work going in the shop however with various small projects underway. The Mechanical fish is on that list of course. I've started on the sculpting of the detail, beginning with the mechanical fish. Because of the overlapping riveted plates it is necessary to start at the back and then work forward. So far I've managed two one-hours sessions of sculpting and made pretty good progress. The routed form as a base makes the sculpting very fast and minimizes the amount of sculpting epoxy I need to use.


Stay tuned for more progress...

-dan