WELCOME!

It is hard to believe that it was almost ten years ago I witnessed a CNC router in action for the very first time. I was fascinated and simply had to have one! Although I had been in the creative end of the three dimensional sign business for most of my life I didn't really know what I would do with one of these machines - but I just knew it could do fantastic stuff.

Along with the CNC router I discovered the wonderful material called Precision Board and the glues, primers and other companion products they offer. Since then we have gone through many tons of the material using it in most signs and projects we tackle. This journal will chronicle our many adventures both past, present and future. I'll talk from the perspective of someone who pushes these products to the creative limit on a daily basis. I'll be adding to the stories two or three times each week. -dan

Thursday, September 30, 2010

Learning new things.

With each project we take on I know I will learn many new things. In the case of this project it is true many times over. Because we are stretching the limits of what we do with the CNC router in our effort to show what it is capable of I have learned many new things on that front. We've experimented with new colors and glazes asa well. The rapid texture feature of EnRoute was a whole new field of endeavor for us.  And because it has been a while since we have done an industrial project we have discovered many new things about our current building code and how it applies. With our wanting to build something truly different the learning curve has been multiplied exponentially.

This week I volunteered to do our own T-bar ceiling in the MultiCam board room. I knew what I wanted and felt it would just be easier and quicker to do it myself as part of our duties instead of letting the contractor take care of the task. How hard could it be? Little did I know that T-bar ceilings now have to meet stringent building codes and be seismically stabilized and engineered. I also opted for ceiling tiles with a reveal... not knowing they have a 1/4 lip instead of the standard half inch one. I had to be super accurate and on my first curved ceiling too. Each bar I put up had to be seismically tied to the structural ceiling above as did each pot light and fixture. The fellow doing the standard T-bar ceiling in the rest of the building had a good laugh watching me work. But he was also a good sport and offered some suggestions along the way. For good measure we had decided to paint the ceiling the same pearl blue as the walls. It looks spectacular but is also plain old hard work to achieve. As we turn and look back each day as we are leaving, the result has been well worth the effort.


Today for the first time the center pot lights were turned on - 11 in all. The work we've done over the last weeks was at last seen in the final light it would live in. The colors and layers of glazing came alive. Tomorrow the last 12 pot lights will be installed and the work lights extinguished and removed for good.


I'm back in my studio now, designing the last of the pieces to be routed for this room. As we do the last of the labor our thoughts are turning towards the rest of the projects that need to be done for this job. The last of the rapid texture wainscoting was glued on the wall today elsewhere in the building. The MultiCam medallions and corner blocks are almost all up. The painter has begun priming and will be going full blast with the paint over the next week or so. It's coming together faster each day.

They say any day you learn something new is a good day. I d suggest that I have more than my share of good days.

-dan

Getting a handle on the small bits

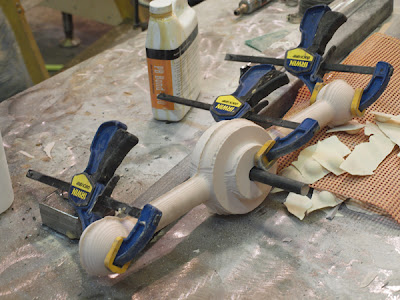
With EnRoute Software and our MultiCam router I can fashion just about any part I can imagine in a hurry. But the material I like to use 30lb Precision Board isn't overly strong - especially if the part is to be handled. I needed a handle for the submarine door (the white board) and I knew that it would get tugged on regularly. The solution was simple. I cut some 5/8" steel rod and welded up a 'T' shape. Then using my die grinder I hollowed out the inside of each piece .


I test fit everything to make sure it went together properly. The vertical piece protruded out the back of the handle.


Using Coastal Enterprises one part urethane glue PB Bond 240 I coated the piece making sure some dribbled into the cut. This would expand as it cured filling any hollows I had created.


Then I popped it into the clamps overnight. In the morning I used the die grinder once more to clean up the edges and also add a little 'wear' to the piece. This was an old submarine after all.


Once we got onside I drilled a hole in the center of the door and glued on the handle. I can confidently know that no one is going to break this handle when they try to open the door.


Today we'll add the primer and some aged paint to complete this piece. We are thinking of copper rather than the rusty steel but we'll see...

-dan

Sunday, September 26, 2010

Another one done!

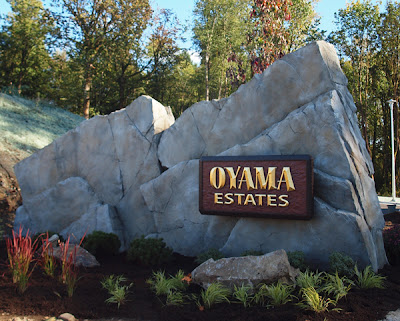
Our projects tend to be large and often last many weeks or months. The process seems to take a long time sometimes as each piece is designed, crafted painted and assembled. Commonly the pieces are never assembled until we are on the site as they are simply too large to fit together in our shop. Yesterday was due day for the Oyama Estates subdivision project. The owner asked us to hold off delivery and installation until the day of the grand opening so everything would be fresh and new.


The trailer and truck was loaded the night before with all the tools and supplies we would need. Saturday morning we headed out. The day dawned clear and bright. The beautifully wooded site provided the perfect backdrop for the signs we were to install. Phoenix and his crew had finished the rock work last week. We had polished off the tree in the same time period. The landscapers had done their part. Wee would add the finishing touches with the signs. 


The theme of the project celebrated the sister city of Mission, B.C. where we were doing the project. Each lot sign had the Japanese symbol for a positive attribute as well as an english translation and the house number. We would be mounting them to the large rocks the owner had placed on each lot. I had to simply drill a hole in the rock and glue in the sign. I had a large generator with us and all the heavy duty tools I needed. What I didn't allow for was the hardness of the rock we were drilling into. The first two concrete bits I used melted down in minutes with only a shallow hole the result. A quick trip to town was necessary to stock up on some new drill bits. Thankfully, only the first rock proved to be that hard and the holes were bored and the signs were mounted in plenty of time. 


The bigger signs mounted to the brackets we had built into the 'rock' framework without difficulty. The last sign we had to go in was the unique street sign. Since we only had one hole to drill I used an old fashioned auger to drill the hole. I was thankful we did for as I neared the bottom we hit some type of conduit. I felt it before we did any damage and by simply sliding over the hole we cured the problem without difficulty.


With the last sign in we presented the smiling owner with the bill for the final draw and rushed home to change before we went back for the opening celebrations. Another project was done! 

-dan

Friday, September 24, 2010

It's all in the details...

Branding is important. We would all know to include our logo on our sign and stationary. And just about every company with a receptionist displays their logo in the entryway. Some go a little further but not much.

With the MultiCam center we are designing and building we are looking ways to include the MultiCam brand at every turn. There's lots of in your face ways but also many, many very subtle ways most wouldn't think of. With every element we are installing I ask the question... what can I do to showcase the CNC machines and their abilities. How can I show the brand?

One thing the MultiCams are known for is the quality of the machines. They build them with quality and heavy duty parts. One of the distinctive parts are the linear gears that the powerful servo motors run on. The linear gears run parallel to the surface of the table. When we were designing the chair rail for the hallway of the MultiCam Technical center the linear gears came to mind as they are at about the same height. In a subtle way, creating a profile would 'sell' this MultiCam feature. It would also demonstrate that just about any profile molding can be instantly created with one of these nifty CNC machines.

Below I show the gear that inspired the molding and below that is the molding we ran with our MutliCam. The file was created in EnRoute of course. 


As they get finished up and installed I'll post some more pictures.

-dan

Monday, September 20, 2010

Working on two fronts at once.

While we were busy painting the board room at MultiCam our MultiCam was busy back at the ranch whittling out the last of the lot signs for our Oyama subdivision project. The signs were designed in EnRoute with bevels, layers and textures of course. They were cut from 30 lb Precision Board. Over the next few days we'll paint them up and gild them too for a little bit of sparkle. Each marker will be mounted to a large rock which is to be surrounded by a Japanese styled garden.


It's quite the pile of signs - with six more still being cut as I type. Using EnRoute and the MultiCam to create the signs (save for painting) makes production of this type of project easy and fast.

-dan

Sunday, September 19, 2010

another movie!

I'm really new to this movie business but it seems to be a really good way of showing this project. The colors show up pretty weird as the room only has a few temporary incandescent lights strung through it. We made great progress today with the base coats and translucent pearl coats now on the walls. The rust is forming nicely on the 'metal' parts and the wainscoting is almost done. The whole project looks so much better in person but for now this is as good a peek as I can give. We'll be setting up some more professional photo shoots with proper lighting when everything is done.


Take a peek at the video and let me know your thoughts and suggestions...

-dan

Saturday, September 18, 2010

Damn the torpedoes - FULL SPEED AHEAD!!!!!!!!!!!!!!!!!

This morning when we walked in the rust was indeed on the large pipe overhead. It looked like real rust too- which is exactly what it was. The massive pipes looked like they had been around a long, long time - just as we intended.


We started in on the first of the pearl blue coats of paint - only to discover they didn't look very good on our white base. So we broke out the baby blue stuff instead and laid on two quick coats of base color before trying the glaze once more. It worked like a charm.

On the lower Rapid Texture wainscot panels a coat of pearl was put on over the blue base we had laid down yesterday. The texture danced in the light with the metal flake. It's going to be cool! Later in the day I started in on the first of two colors of glaze - a darker metal flake blue. It will be followed with a custom color we call plum crazy to showcase the texture to its greatest advantage.


Donna (who helps us out from time to time) got to climb a ladder and start in on the 'cast iron' beams and the second set of pipes. The project is starting to come together nicely...


Tomorrow while the building is nice and quiet we'll head back in for another blitz at the colors...

-dan

Friday, September 17, 2010

Let there be light!

Yesterday as we discussed new color options for the board room walls I insisted that all concerned take a look at the submarine centerpiece before final opinions were formed. We jumped in the car and travelled thirty minutes back to our shop to see what I was excited about. The magic happened the instant I plugged in the sign. Everyone fell in love with the brilliant blue reflections the LED lights formed on the sign. The metallic pearl paints of the background bounced the light around in a spectacular fashion.


Now we will seek to duplicate that same look in the big room with blue LED lighting around the tiny valance under the large pipes. I can hardly wait to throw the switch when they are done!

LED lighting is now going to be a big part in future routed dimensional signs we do...  imagine the cool effects we can achieve!

-dan

COLOR!

We finally got into the worksite again mid week after waiting for the ceiling fireproofing and the room in general to dry somewhat. Everything is super damp but suffered only a little water damage... at least nothing we can't fix in a hurry.  Paint is taking a long time to dry - even with our fans going full blast, meaning we have to skip around the room and not always do things in a logical order. The last of the texturing primer went on today and now we are on to color in a big way.

Yesterday was a day of testing colors, making sure everything worked together on a large scale. Sadly it wasn't working very well but after some 'meeting of the minds' and a spirited discussion we opted for a much brighter color scheme for the room, going away from the decorator's choice of taupe on the walls and ceiling and going back to my original concept of having the walls a blended blue instead. My daughter Rebecca worked her magic and came up with a pearlized color scheme that will go from a very light blue on the ceiling to a darker blue as it works down the walls. The indirect LED lighting just below the large pipes will now be blue instead of white creating an almost magical underwater feel. It is going to be incredible when it is done!


We did the first of the rust treatment on the big pipes. In the picture Rebecca is looking for the first hints of rust to form - just after we sprayed on the acid. The pipes looked ominously dark and still very black as we left but through experience we know by morning they will have formed a wonderful rust patina.  With the dampness in the room it may take a little longer than usual.


The blue base coats on the wainscoting is looking cool. On the upper walls we are doing super white base coats before we go on to blended blue pearl and the darker patinas on the edges. The ceiling will be 2' square T-bar ceiling but we will press our MultiCam into service once more to make large rivets for each corner of the tiles, transferring a little magic above too.

Tomorrow we will be back at it, working a little overtime as we strive to get the room finished before the beautiful cork floor goes in - only a week away!

Stay tuned!

-dan

Tuesday, September 14, 2010

Finished wall candy


The six STL files I purchased and downloaded from the internet turned out pretty fine. They routed without any difficulty and combined with a textured background panel and four rivets (created in EnRoute they will fit right into the MutliCam board room. We primed them with Coastal Enterprises water based primer, purposefully leaving a bit of a stipple texture with a brush in the thick paint. Then we put on three coats of the metallic copper (also by brush) and topped it off with a dark brown glaze. We may yet add a little green patina but will make that decision after everything else is done and in place.


The plaques vary in size a little but are approximately 18" x 20". They all were routed from 30 lb Precision Board that was 2" thick. Under the indirect lighting they should look spectacular!


We used the same copper color and glazes on the frame of the submarine piece that will be featured on the center wall. It is coming along nicely and will be done later this week. Stay tuned...

-dan

Sunday, September 12, 2010

Hang ups

One question I often get asked is 'How do I hang our signs?'  The answer of course is varied depending on the nature of the project but often I will use what I know as a french cleat. Basically, a board is ripped at a 45 degree angle and one side is mounted securely to the wall - the other to the sign. When the sign is hung the 45 degree angle of the boards keeps the sign securely in place, tight against the wall and also level without worry.


In this case the engineer and building inspector wants everything twice as secure as what I would consider normal. The sign is heavy (about a hundred pounds) and it is being mounted to a drywall surface. When I designed the sign I put a recesses surface into the back to allow for the bracket and wiring. I cut two pieces of half inch plywood to shape and two french cleats (four pieces) at a 45 degree angle. One piece of plywood was glued and screwed to the sign, the other will be mounted to the wall in similar fashion. Then I leveled my sign on the workbench and mounted the cleats to the sign using a level. I fastened the cleats to the wall plywood, making sure they fit into the sign properly. 


I mounted the wall bracket securely to a stack of Precision Board in order to mount my sign while I worked on it. Rather than work on a sign flat I prefer to do it with the sign sitting as it will when it is done. In this fashion I can see how the lighting and shadows affect the coloring and shading we are doing. When we are ready to mount the sign I'll remove the bracket from its temporary home and glue and screw it to the wall before mounting the sign permanently.


The sign is now base coated, waiting for the glazes which come next.

-dan

Side details and other stuff

I finally had some time to return to the little submarine project which will be the centerpiece for the board room. With EnRoute and our MultiCam we had created all the surface texture in fine style. With a little planning I could have created files for the top, bottom and sides and then routed them. This would have meant it would only need a little handwork to blend them. I've done this in the past with good results. On this project I wasn't sure how deep I was going to go with the sub on it and all. So I decided to do it by hand this time. The sign had been laminated up from many layers of one inch material. I had used up scraps saved for this purpose.


To bring the texture around I like to use an air powered die grinder. Like the router it vaporizes even the 30lb Precision Board in a hurry. I used a tapered bit with a round end so I could mimic the grain on the front.  I did the top first, keeping things relatively flat. The sub has to sit there. Then I started bringing the grain over the end and around to the front - matching both grains. Diagonally works well and adds interest.


I kept things a little bumpy and rough to match the front. The object is to not be able to see where the router left off and the hand work began.


Even the bottom got the treatment. It's not likely that anyone will see it, but if they make the effort to bend over and look there they won't be disappointed. I spent about an hour adding hand texture to the piece in total.


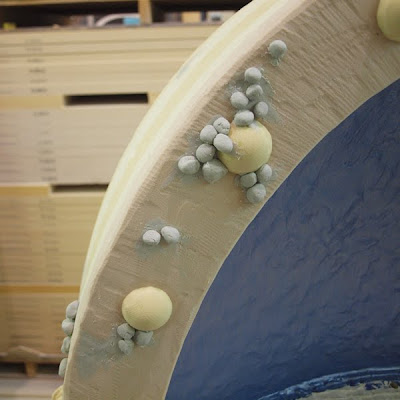
Then it was time to add some sea life. For our sculpting we use an epoxy sculpting medium. Its a two part putty - not unlike plasticene which I played with as a kid. Only this stuff gets rock hard in a few hours. I did the biggest element first. the star fish is simple - five legs with little balls of sculpt for decoration. 


Then I pressed on little balls of sculpt in random clumps. These would become our barnacles.


To sculpt the barnacles I use a custom made tool...  simple really. I break off the end of a stir stick and then sharpen it like a pencil with a little flat point on the end. This is pushed into the center of each ball of sculpt and then used to push the edges down a little to create a rough texture.


And as simple as that the sculpture part is done. I let everything harden overnight and then applied a coat of Coastal Enterprises water based primer. I used my brush to apply a simple stipple pattern to the starfish.


Now the piece is ready for final paint at last. The heavy grains and textures will make it easy to add lots of rich color and aging. When we are done it will look like we brought this up from the deep and hung it on the wall. I can hardly wait!

-dan

Saturday, September 11, 2010

Questions, answers and comments...

Lots of folks seem to be enjoying the ongoing series of articles I post each week chronicling our routing adventures and projects. I get feedback from those in the industry, and I also get plenty of emails and phone calls which I appreciate. Feedback on all fronts will continue to shape this blog in the future.

I also get lots of questions concerning our projects. People like to know why I do some of the things I do. They need to know the logic behind the actions. I fully understand this. Even thinking about things and documenting them here forces me to think about how and why I do them the way I do.As I prepare for and teach my workshops I have found I am learning a whole lot in the process.

But I also know that much of what I do is commonplace for me because I do it all the time. I know it through repetition and experience. And I believe it's easy for me to forget that others, including many who might follow this blog are at the start of the game and new to the world of routing or making three dimensional projects. Or some seasoned pro's (who could teach me many tricks) might look at something I do and wonder why I do it that particular way. I have lots to learn!

I read every email I get and do my best to answer every question. Through experience in our workshops I know the best sessions are when I get lots of questions and discussion. If one person asks it, chances are there are others who were wondering the same thing. Sometimes the question and comment periods can lead the discussion in ways I might not have thought of and a lot of learning takes place.

I would encourage everyone who reads the blog to take a minute and ask those questions that come to mind in the comment box at the bottom of each entry. I'll take the time to answer. If I don't know the answer I know plenty of folks who most likely do. If you want to see a new subject covered or perhaps see more detail on something I have done please let me know. We'll all learn in the process. 

And that is what this blog is about...

-dan

Friday, September 10, 2010

Simple is sometimes better.

Square or rectangular is the shape my materials arrive. It's not often I make signs that shape. But every once in a while the design of the project is such that a square or rectangular sign is the very best way to go. Simple is sometimes better.

The entrance feature we are building for Oyama Estates is one such project. The rock work is monumental, measuring more than nine feet tall and twenty feet wide on each side of the road. Sculpted by Phoenix Bermudez of Stone Tree Studios it is layered and rough and will be colorful too. The big bonsai tree that perches on top will add to the mix. To fulfill the feeling of tranquility we are seeking to achieve, the signs I designed needed to be very simple and elegant.


There is one for each side, measuring at just over five feet wide. They feature raised bevelled lettering and a mild texture. Each was designed in EnRoute, using the same background and then adding different lettering. In this fashion I only had to build the bulk of the file but once. The signs were routed from 30 lb Precision Board using a 3/8" ball nose bit to rough cut and a 1/8" bit for the final pass. I then added a heavy texture coat of Coastal Enterprises primer and then the usual acrylic paints for the base color. I layered on multiple glazes to build up rich colors on the background, resembling the look of leather when I was done. The gold leaf on the lettering was the finishing touch and adds an elegance impossible in any other medium.  The border is textured and beveled as well to add depth and play in the light. I look forward to seeing them in place on the rock, the simple icing on a complex, multilayered cake.

Once in a long while square is best.

-dan

Wednesday, September 8, 2010

Variety is the spice of life!

On the MultiCam project I am trying my best to use every trick in the book... to use the router and other CNC tools in every way imaginable. 

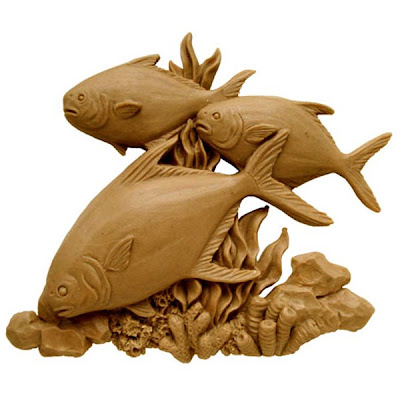
I don't use meshes created by others often, and when I do I always try and modify them in some way in order to create something original to the project I am doing.  Lots of folks use 3D models off the web however as they are a great way to save time if you can locate some well built files. The nicest files I have found (at a reasonable price too!) is at 3dmodelclub.com. I ordered up six of them late this afternoon and my order was processed within a short time even though I was a new account. Downloading the files only took a few more minutes. Then it was time to have some fun.  Since the room was to have a nautical theme all of the files were of similar topic. The first file was of a group of fish...


There will be six panels which will be 'riveted' to the walls of the nautical themed board room. I want them to look as if they are cast iron and aged in a similar manner as the rest of the room when we are done. I built a base panel in EnRoute complete with a rivet in each corner to 'hold' it securely on the wall. I added one of my bitmap textures called 'splotches' to create some surface aging. I saved this as a template for the six panels. Then I opened up a STL mesh file I had purchased from the 3D Model Club online. THe files are very large and of good detail. I sized it and positioned it to fit above the panel and below the top of my 2" 30 lb Precision Board. Then I selected both and combined the two files, then deleted the mesh and tool-pathed the file. As easy as that the file was complete and ready to route.


The second file was of a jumping fish. Once again I opened the template and positioned and sized the STL file, then combined them and tool-pathed the file. They measure about 24" x 22" and will look really sharp when they are finished - especially with the indirect lighting washing down over them.


While I was making the second file the MultiCam was busy whittling out the first.


Another piece of the complex puzzle that is the MultiCam Board room is now well under way.  The ceiling was being sprayed today and tomorrow with the fireproofing meaning we can get into the building once more on Friday or Saturday at the latest. I can hardly wait to continue the build.

-dan

Tuesday, September 7, 2010

Endless rivets

Now we are down to the slower part of the project. All the big stuff is in and secure. The wainscoting is installed and the trim is in place. Even the pen holder is fastened where it belongs. 


Now it is on to the little bits. I've been measuring and installing rivets for what seems like a long time. Each is machined from 30 lb Precision Board. The MultiCam will be busy today making the last 150 pieces we need. About the time I am gluing on the 300th rivet I start to question the sanity of the design I have created. But then I step back and realize how important those little bits are and how much they add to the project collectively. 

I have sketched out the signs I will need to yet make and the decorative pieces are all planned out in my head. The door overlay ideas are ready to be designed and then routed, ready as soon as the doors are hung next week. The finished details of the room will be wrapped in plastic once more this afternoon as the trusses are sprayed with fire resistant flocking. (delayed from last week). 

Then it will be a race to the finish doing our best to get the painting done before the flooring guys start in on their task. I can hardly wait to move the giant board room table in to place as the crowing touch! 

In the meantime we will shift gears and keep busy finishing all the pieces for the other rooms we are doing for this project...

-dan