WELCOME!

It is hard to believe that it was almost ten years ago I witnessed a CNC router in action for the very first time. I was fascinated and simply had to have one! Although I had been in the creative end of the three dimensional sign business for most of my life I didn't really know what I would do with one of these machines - but I just knew it could do fantastic stuff.

Along with the CNC router I discovered the wonderful material called Precision Board and the glues, primers and other companion products they offer. Since then we have gone through many tons of the material using it in most signs and projects we tackle. This journal will chronicle our many adventures both past, present and future. I'll talk from the perspective of someone who pushes these products to the creative limit on a daily basis. I'll be adding to the stories two or three times each week. -dan

Friday, March 30, 2012

Have I got a deal for you!

During the Sculpting Magic Workshop I did up a wooly mammoth as my demonstration piece. It's been moved ten times since and so I decided he better get a proper mount and get hung on the wall before he gets damaged. I asked Hailey for an idea... what would be a good name for a business featuring this lovable creature. She came up with Wooly's Carpets. PERFECT!


I wanted a font that was a little shaggy and it didn't take long to find one that looked fuzzy. I measured up the base oval to which I had built the mammoth and then started in on creating the vectors. I did the basic letter vectors around an oval in Illustrator, then imported them to EnRoute to finish building the files. I used the draw polygon tool to create the star.  I started with 13 points but I would reduce this number later. I just wanted to start out with more than I needed so I could delete nodes instead of adding them.


I used the node edit tool to place the star around the oval. It reminded me of those cheesy adds we often see - perfect for this type of sign.


Then I went around the star one more time placing the points perfectly and reduced the point count to eleven. I also used the offset tool to put a border around the lettering.


The first relief was a flat star.


I then used a bitmap from my TETURE MAGIC collection to add some subtle texture.


The oval shaped donut was built as a separate relief using the dome tool. The inside was dropped down 0.3 inches leaving the letter border proud.


Then I Added a spaghetti texture to the inside of the donut using the lettering outline as a mask.


 Once I was happy with the vertical placement I merged highest to form one relief.


The last step was to add the lettering using the dome tool. Now it was ready for tool pathing and then it was off to the MultiCam to be routed from a piece of 1.5" thick Precision Board.


I'll run the file tomorrow and then show how it went together. Stay tuned...

-dan

Thursday, March 29, 2012

Soggy success

Today dawned cool and very wet. And it rained harder as the day went on. Even so, today was the day we would install the Lark Rise sign. The client was responsible for the hole in the ground and did a great job. We arrived with the sign in perfect shape. Hailey mixed up the concrete while I untied and prepped the sign. The landscaper gave us a hand lifting it up and it slid into place in an instant. Four bags f concrete mix later the sign was permanently installed. I checked things with the level and then we stacked  few rocks around the base for the pictures. The client will landscape the area properly on a nice day soon.


The sign fit perfectly into it's permanent home. I'll go back on a sunny day to paint the metal brackets and structure. Today was just too soggy for the task.

-dan

Monday, March 26, 2012

Creating a fossil with bitmaps

I love working with bitmaps to create textures. For me it is easy to see how the various shades of black white and grey will affect the reliefs inside EnRoute. Somehow my brain allows me to translate the values easily.

I get many enquiries as to whether we can use photographs as bitmaps. The short answer is generally NO - but with exceptions. A few bitmaps do work with a little tweaking. Others require a bunch of work in a program such as PhotoShop to make them work.

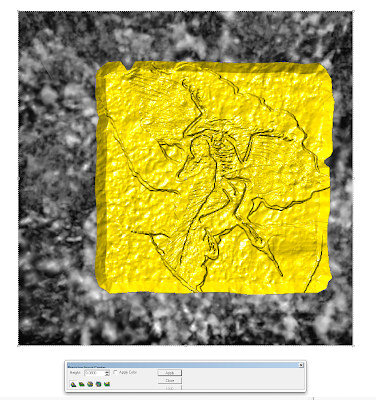
A while back I did a fossil room at MultiCam Western Canada, largely using bitmaps for the textures. In my TEXTURE MAGIC COLLECTION there are a number of fish fossils and skeletons. But this week I received a request for the archaeopteryx fossil. I had to do a google search to figure out what he was talking about. It was one of the bird fossils I had done at MultiCam. It had been flipped to fit as part of a set.


The photographic files I had used there were long gone but it only took a few seconds to locate them again via google. thanks to my friend's accurate name that he provided me with. I found some shots of the original fossil and many reproductions.

The one I chose to use was the most complete. It would require a fair amount of work to make it usable. All work on the picture was done on a copy, leaving the original behind for reference and other work on other bitmaps.

I bumped up the contrast significantly, then made it a black and white image. This was the starting point. I had to keep in mind that white would raise the image, black would do nothing, grays would do something in-between.

I then adjusted the contrast once more, whipping out much of the background detail. I would add this back in by hand to achieve the effects we wanted.


Then I used the eye dropper tool to select the right shade of gray and carefully filled in the background using a brush tool, leaving the feather details behind.


Once I had eliminated the background I inverted the image to create the bitmap file I needed. This was named and saved to be imported to EnRoute later.


Close examination of the original file showed me that layers of the original rock had been chipped away in the center portion to reveal the bird fossil. The next bitmap I created would mimic this effect. I used two shades of gray with a hard edge brush as well as a big soft brush for one portion to achieve a graduated layer. The light gray behind is the original photograph on bother layer. It will be eliminated when I was done.


 Once I had the bitmaps I needed it was time to kick off the project in EnRoute. I first created a jagged outline of a flat squarish rock. Then using the bevel tool I created a flat panel using the LIMIT TO HEIGHT command with 45 degree edges.


I imported the first of the fossil files I had created and placed it over the relief... then applied the bitmap.


The second bitmap would create the chipped edges to mimic the stone of the picture, revealing the fossil.


 Lastly I would use one of my SPLOTCHES textures from the TEXTURE MAGIC DVD to create a little sandstone texture on the relief. As quick as that the file was ready for tool pathing. Seconds later it was on the way to the waiting MultiCam. It would be routed from a scrap of 1" thick 30 lb Precision Board.

The file took much less time to route than it did for me to write this post. I snapped a quick pic to finish this entry. I'll give this sample to my grand daughter Phoebe (now seven) - a dinosaur buff since she was tiny.


I'm starting work on a second TEXTURE MAGI DVD collection and these files will be included.

-dan

Sunday, March 25, 2012

Special delivery

Creative doesn't stop with the fabrication of our signs and projects. From the design onwards I try to think of how we will support our projects while we build them, how to safely transport them (without a scratch) and how to securely and permanently mount them in their final home. The Lark Rise Sign proved to be especially challenging. We'll dig a hole onsite and plant the base into some concrete to keep it upright. To fabricate and paint the sign I welded a flat plate to the bottom of the sign. It bolted to a stand for fabrication and to a post (which will go into the concrete). 

I could transport the sign upright as it would have been too tall. So we had to think up something creative. We don't want to rub any blended paint off of the sign or post surfaces. So the solution was to support the sign by the sturdy metal points. It would be easy and quick to paint on site after the sign is installed. I welded up three metal cradles which I could fasten to the wooden deck of the trailer with some lag bolts. The sign would slip onto the cradle, suspended of the trailer bed for transport. 


I'll tie a red flag to the bottom post and then strap the sign down tight to the trailer real good - all straps will be hooked to the melt parts of the sign. We don't want any scratches to the finished paint.

-dan

Thursday, March 22, 2012

All eyes on Orlando

This week is the International Sign Association show in Orlando. Sadly, I didn't get to go this year. Some of the work we have done did make the show, showcasing the software, materials and machines we use to create our signs. This afternoon I received an email from my good friend Mark from Hawaii with a picture of the piece we did for Coastal Enterprises. Thanks Mark!

The task on this piece was to showcase a number of textures and faux finishes and make the Precision Board look like a variety of other things. No matter what the viewer may think, everything except for the pipe holding up the plane and bits of the weathervane are made from Precision Board. The challenge was to do it all in a space measuring two feet by two feet and not block the vision into the display booth. It went from concept sketch to finished piece in only four days.


I wish I was there to say hi to all my friends!

-dan

Monday, March 19, 2012

Quiet here, busy there

The last two weeks have gone by in a blur. With two different workshops in ten days we've put in a tremendous amount of hours, but little actual routing time. This week things will kick back into regular mode.

The Sculpting Magic Workshop was great fun. We had a great deal to accomplish in the few days we were  in the shop. We had routed sample pieces to learn the painting techniques as well as the backing plates for the dinosaur sculptures each of our guests would sculpt.


We sculpted a variety of panels in fiberglass reinforced concrete. Each student learned how to sculpt brick, rocks and smooth to knarly wood grains.


The toughest challenge of the workshop was to weld up, wire and sculpt a twisted tree. Under my watchful eye each student did a wonderful job.


Our group was small but the enthusiasm and willingness to tackle many tasks previously not thought possible made for some wonderful projects. I look forward to seeing many cool projects from each of these guys in the near future.


 -dan

Wednesday, March 14, 2012

The key to merging

Today I spent my time teaching a relative newcomer to EnRoute the ins and outs of merging reliefs. Like many he found the concept of merging reliefs somewhat hard to grasp. There are four options but today I will deal with two - merge highest and merge lowest. After some simple exercises and lots of trial and error it was time for a real file - a KEY. It would employ both merge highest and merge lowest as well as some other tasks. The file was in fact harder than it looked at first glance. While certain pieces could have been done with sweep to rails I was trying to keep things simple... or at least as simple as possible for this exercise. The key we were modeling had two key ways cut into it at different depth. Both were cut with a circular grinding wheel and so were rounded upwards at the big end of the key. That was the difficult part.


The vectors were relatively easy - all done in EnRoute.


The first relief I created was for the key ways. I would model the key at two inches thick and thin it down later. Since I wanted the key way to go half way into the key it needed to be one inch deep and ramp up at the end. By using the scale to height on the rounded relief I could control this. Take note I used the subtract from relief command to make it go down.


To create the flat portions of the key I created two rectangles which would be used to create flat reliefs two inches high (The same height as the key)

In this screen shot (front view) you can see the thin grey line is the top of the flat reliefs while the bowl we created is well below. I would use the up key to nudge it upwards until it was even with the two inch high flat reliefs.


Then it was time to use the MERGE HIGHEST command to merge the flat reliefs to the key way bowl.


The result (after I deleted the no longer needed rectangle reliefs) looked like this. 


Then it was time to create the key relief. This was done as a two inch high flat relief in the shape of a key.


To match the sample I modified the key relief with three grooves across the head using the bevel tool and the subtract from relief command.


Then it was time to use the MERGE LOWEST command. I would be modifying the key relief by using the keyway bowl with the two inch high vectors (previously merged highest to it.)

 Now we had a good looking key.

The last step was to use the narrow keyway profile to modify the key shaped relief. I positioned the relief correctly then stretched the modifying relief down a bit. I again used the MERGE LOWEST COMMAND to modify the key shaped relief.


The result was a good looking key. But we were not finished yet.

Since I had modeled the key at two inches think it didn't look at all proper. 


In the front view I simply grabbed a top node and shrunk it down to size. PRESTO - perfect key.


So there you have it... the key to learning MERGE HIGHEST and MERGE LOWEST.  Give it a whirl and I hope this helps!

-dan