WELCOME!

It is hard to believe that it was almost ten years ago I witnessed a CNC router in action for the very first time. I was fascinated and simply had to have one! Although I had been in the creative end of the three dimensional sign business for most of my life I didn't really know what I would do with one of these machines - but I just knew it could do fantastic stuff.

Along with the CNC router I discovered the wonderful material called Precision Board and the glues, primers and other companion products they offer. Since then we have gone through many tons of the material using it in most signs and projects we tackle. This journal will chronicle our many adventures both past, present and future. I'll talk from the perspective of someone who pushes these products to the creative limit on a daily basis. I'll be adding to the stories two or three times each week. -dan

Sunday, August 23, 2015

Denver Workshop SOLD OUT. Two more workshops still available.

The Denver Workshop is now sold out. There is a great group of eager participants signed up for the workshop in Denver. Preparations are well under way and travel plans are all made. We are looking forward to a great time of learning!

• Hackensack NJ, October 8-9 @ Multicam Technology Center
• Anaheim, CA, December 3-4 @ Multicam Technology Center


 “The EnRoute workshop was worth every cent. The instructors patiently relayed, in detail, every aspect of EnRoute’s 2.5D, 3D, Rapid Texture techniques and the many other functions of Enroute. I am now able to take advantage of the tremendous features provided in the software. Thanks Enroute!”
- Henry from H & S Marine Plastics, New York/New Jersey Workshop Attendee

 RSVP 

Early Bird Discount Space is limited, so register early to guarantee your seat. It's $995 to attend the 2-day class but you save $200 when you register 30 days before the event. Attendees from 2014 save $300 when you register 30 days before the class.
To register, contact Terri Wright
1800.229.9066 x114 or EnRouteSales@ThinkSAi.com

Details

Bring your own computer and follow along on your PC with a demo version of EnRoute we’ll provide. No key required. Here is the 2-day class schedule:
Day 1, 8:30am - 5pm
Morning – It Never Hurts to Know the Basics
• EnRoute Concepts Review
• Toolpath Basics
• Nesting
• Output & Ordering
Afternoon – Advanced Toolpathing / Cutting
• Inlays
• 2-1/2 D
• Rough, Fine & Clean Tools
• Advanced Entry/Exit
• 
Day 1 Wrap-up and prepare for Day 2
Day 2, 8:30am - 5pm
Morning – Now for some Fun Surfaces
• 3D Surface Concepts
• Building a Relief
• Parametric Textures

Afternoon – EnRoute Rapid Texture
• Seed Contour, Objects as Seed Contours & 3D Reliefs with Rapid Texture
• Rapid Picture (Photo Cutting)
• Noise and Distortion
• Day 2 Wrap-up and Q & A
EnRoute Classroom

Cam

Cam is a returning workshop attendee. Last time I made him a riveted 'metal' panel. Cam is an engineer (among many other things) and so I decided to make him something techy this go around. The panel is relatively simple but I used a couple of tricks to add more dimension. I drew the piece entirely in EnRoute. The outside shape is a rectangle and circle combined. I first created a flat relief.


Then I dropped the centre portion using the subtract from command. I dropped it 1/4" to allow for the texture to be added inside this area.


The texture I used provided the tech theme. It is a simple black and white texture. The black areas would stay low while the white would raise up by the .15" I specified. This meant the top of the texture was still 0.1" below the border.


I then applied the 'SPLOTCHES' texture with a value of 0.1".  This would bring the background up to the border where the image was white and slightly below where it was darker.


I wanted to create a bump in the middle of the panel so I used the circle vector as a mask to define the area to be raised. I used the dome tool but kept things very subtle.


Then it was time to create the lettering border. This would eventually follow that same dome shape of the base relief but first I created a separate flat relief.


Then I used the larger circle to modify this base relief using the dome tool.


Then I went to the front view to check things out. I found that the edges of the lettering outline were touching into the background. It was a simple matter of selecting this lettering outline relief and then nudging it upwards using the up arrow keys on my keyboard.


Once I was happy it was time to merge (highest) the lettering outline with the base relief.


The last step was to modify the relief by adding the bevelled letters. I used the constant height function to better manage the areas where the bevels came together.

Saturday, August 22, 2015

Joel

It's both challenging and fun to come up with a different name plaque for every attendee of our workshops. While there are some that are somewhat similar there have been well over two hundred original name plaques created so far. creating the name plaques has been a great exercise that sharpens my skills as a designer and using EnRoute. We also use the name plaques to come up with new new painting techniques. We've learned lots along the way.

Joel's name plaque was next. With only four letters it begged to have a creative layout. Stacking the letters to create a square shape looked good too me.

The file was created totally in EnRoute.  The letters were modified to make them fit together properly. I shortened the horizontal strokes of the 'E' and 'L' to make them be the same combined width as the 'J' and the 'O'.  Once the vectors were in place I created a base relief using the dome tool.


Then I added a subtle texture over the entire relief using the 'SPLOTCHES' bitmap.


Then I used the subtract tool to drop the centre of the square base relief.


I then dropped the centre square one more time.


Then I raised the lettering border by modifying the base relief and the 'add to' function.


Then it was time to add a little more texture - this time the sandblasted wood (vertical) bitmap was used. You can see I stretched it out to cover the entire centre portion.


Then I used the bevel tool to add the lettering by modifying the base relief. note I used the contant heights the bevelled corners looked a little better.


The last step was to add the rivets around the edge using the dome tool.


The piece was routed from 1.5" thick 30 lb Precision Board for perfect results.

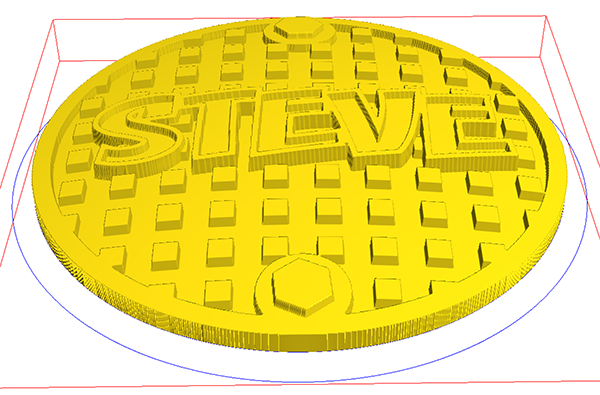
Steve

For the next name plaque I wanted to achieve the look of a cast manhole cover. EnRoute's drawing tools made this effect very easy. I first drew a long vertical rectangle and then used the duplication tool to make copies and space them perfectly. I duplicated the multiple rectangles, rotated them 90 degrees and placed them over the vertical ones. Then I used the combine tool. This created the perfectly spaced squares which I would use a little later. 


I then built the rest of the vectors (except the lettering)and centered the squares over the round shape. I then used the jigsaw tool to create the final vectors. I deleted the original vectors so there weren't duplicates. The lettering was then added.


I then created the base relief using the dome tool. Note the outer circle vector. This was only used as a modification tool.


I then used the subtract tool to drop the centre of the relief down.


The lettering outline and the two bolts were built as separate flat reliefs.


These flat reliefs were then modified using the dome tool and that outside vector I mentioned previously.


I then went to the front view to see where that new relief ended up in relation to the base relief vertically. The first arrow indicates where the lettering border ended up. The second arrow indicates where I want it to be. I then used the up arrow key to nudge it into position vertically.


Once I was happy it was time to merge the lettering outline and the bolt heads to the base relief. (MERGE HIGHEST)


To make this plaque a little different from all the rest I dropped the letters into the lettering border. This should paint up real cool.


I then checked the rendering to make sure I ended up with what I had in mind. It looked good and so it was ready to tool path and send off to the router.


Caitlyn

Caitlyn's name plaque was next up. The typestyle I picked had some pretty sharp and thin ends. If the letters are routed this way the letters become pretty fragile.


The solution is to thicken the tips up. For me the quickest way to do it is to draw new ends and then merge these new shapes with the letter vectors.


 Once the thin ends were fixed the font still looked a little stiff. I wanted it to look like it was hand drawn.


I then used the distort transform tool to warp the letters.


Once I was happy with the letters I added the border. At this point I was still thinking of a rectangular name plaque with rounded corners. But as I looked over the vectors I loved the casual script but the formal shape of the plaque no longer worked.


I decided a piece of driftwood would work better. I imported the driftwood bitmap and hand drew the outline. Then I used the dome tool to create a relief.


Once the relief was in place I applied the bitmap.


Then I used the hand sculpting tool to put some grooves in the driftwood.


The next step was to create the lettering border. I made it a new flat relief. I next wanted to make this relief rounded to the same profile as the driftwood board. To do this I created an oval of roughly the same size as the board.


I then used this oval to modify the flat relief using the dome tool with the same angle on the dome as I used to create the driftwood board background.


I then went into the front view and nudged it into place using the up/down keys.


Once I was happy with the vertical placement it was time to merge highest with the base relief.


The last step was to modify the base relief by adding the bevelled letters.


Then it was time to tool path and send off to the MultiCam.