

The pub crest was challenging in many ways. Creating the file meant using lots of different techniques and tricks. The final piece will be a combination of router work and hand sculpting.

To create the first relief I first had to separate some of the elements and combine some of the vectors. Some parts are simple cutouts and other pieces detailed, textured reliefs. This time around I would do things a little different from much of the work I had done in the past. I would build the files in layers rather than slicing the final relief which I would normally be built in one piece. In doing so I could cut the routing time significantly.

The first step was to create a flat relief 0.2" The relief was only of the background of the crest. Then I selected the flat relief and a circe modifier. I opened the create relief function and using the create dome command set to 13 degrees I modified the relief.. This domed the reliefs I had made to the shape of the circle.

Next came the vertical sandblasted wood grain, a bitmap from my TEXTURE MAGIC collection.

As quick as that the first portion of the routing file was done. I tool pathed the texture portion with a 3/8" ball for the rough cut and a 1/8" ball nose bit on a final pass for the textured part. The cut path was tool pathed with a 3/8" end mill. The piece was cut from 1.5" 30 lb Precision Board.

Next up was the crown for the top of the crest. The balls and crown pieces were created as separate reliefs and then combined. Around this I created a pill shaped vector to modify the original relief, bending it round from side to side.

The last step was a raised diamond for the center of the crown.

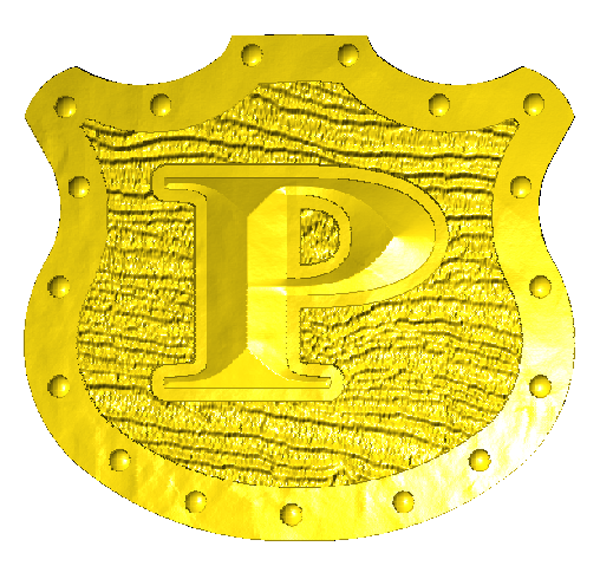
The shield for the center of the crest was the next file to create. the outside the the shield was created as a flat relief, then the center dropped down 0.4" A horizontal sandblasted woodgrain bitmap from my TEXTURE MAGIC collection was used to create the woodgrain. Once again I used an oval modifier to dome the shield. The steps were the same as I described in the previous file. The border around the letter was created as a separate flat relief, modified with the same circle and domed settings. The letter was created with the prismatic relief tool.

I used the modifier once more to put a subtle texture (called splotches) on only the border of the shield.

The reliefs were all combined (merged highest) and as a last step the rivets were created using the dome tool.
The two lettering scrolls were created as flat relief, with recessed lettering. This was modified with a pill shaped to round them out from side to side,

The reliefs were arranged and modified on the plate before tool pathing using a 3/8" ball nose bit for the rough pass and a 1/8" ball nose bit for the final pass.

I set the MultiCam in motion and went to lunch. When I came back the file was done.

I mocked up the pieces to test fit everything and liked what I saw. In the next days I glue the pieces together and then rough out the hand carving. The fox and hound will be sculpted by hand using Abracadabra Sculpt.

Stay tuned...
-dan