WELCOME!

It is hard to believe that it was almost ten years ago I witnessed a CNC router in action for the very first time. I was fascinated and simply had to have one! Although I had been in the creative end of the three dimensional sign business for most of my life I didn't really know what I would do with one of these machines - but I just knew it could do fantastic stuff.

Along with the CNC router I discovered the wonderful material called Precision Board and the glues, primers and other companion products they offer. Since then we have gone through many tons of the material using it in most signs and projects we tackle. This journal will chronicle our many adventures both past, present and future. I'll talk from the perspective of someone who pushes these products to the creative limit on a daily basis. I'll be adding to the stories two or three times each week. -dan

Thursday, April 29, 2010

Seams and edges...

One of the tough things we struggle with when we work with layers of Precision Board is dealing with seams and edges. I like to add texture to the files we create in EnRoute. The router faithfully reproduces them as I imagined. But what to do with the edges and seams as we get into assembly? The answer is to continue the texture over these parts too!

Using Coastal Enterprises one part bonding adhesive PB Bond-240 certainly makes things easier. It bubbles up and expands less than other brands I've tried like Gorilla Glue. The reality is however that I'd much rather put on a little too much glue than too little. The glue that bubbles out is easy to deal with.

Most sign makers use sanding tools to make things nice and smooth and flat. We take a different route. First off - I really dislike sanding. While Precision Board (or other HDUs) sand up in a hurry making things perfectly smooth, I believe this makes our signs look like they came out of a mold or were machine made. I LOVE my MultiCam router but I don't want my signs to look like a machine made them. I want them to look hand made.
We do that by purposely introducing TEXTURE. My favorite hand tool is my die grinder. It makes the hand work effortless and FAST! Precision Board disappears in a hurry when you hit it with a powerful die grinder. A light steady touch and a couple passes is preferable to hitting it hard and fast. Lighter weight boards are real easy to work with, the 30 and 40 lb board we use is a bit tougher. I keep two grinders handy with a large bit and a smaller one. Having two means I don't have to slow down much when I need to switch tools. Changing bits takes time. I also keep a new, spare die grinder tucked away in case one of these packs it in which happens occasionally. I don't oil my die grinders - which obviously shortens their life substantially. I found that if I oil the grinders it sprays out landing on the work... which means a paint failure down the road. The die grinders are much less expensive than my signs or the labor to produce them. So I run them dry.
When I work on the edges of my signs I first whip off the glue lines and even up the layers if things aren't quite lined up. It's probably hard to believe - but I'm not perfect. :) The next step is to do any shaping that didn't happen on the router. In this case this was the rounded ends of the scroll and the fold line underneath. I could have easily programmed these shapes in EnRoute but it was simply faster and easier to do it by hand (for me). Once the glue lines were gone and the shaping was done I then quickly went over all the edges and other areas which needed texture. This included the face of the scroll. The sign instantly looked like I had spent hours and hours hand carving it. MAGIC!
Next I'll add a little MORE subtle texture in key areas like the lettering with the primer...
-dan

Tuesday, April 27, 2010

Quick progress in little time increments

Once the clamps came off it was time for the handwork. The thing I love about Precision Board os how easy to works. There is no grain to fight with. It is predictable. The die grinder I was using went through the 30 lb board like butter. I started with the edges, trimming the glue lines first, then adding a subtle texture over the entire surface. The scroll required a bit of hand work to form the deep curls - but the sign came together in minutes. A little had carving on the mountain complete that portion of the sign.
Then it was time for a little hand sculpting using an epoxy sculpting medium. It is best compared to plasticine that gets rock hard in about 3 hours.
Then it was time for a little sculpting using an epoxy medium. I used this to create the foreground trees on the lower mountain and the rows of plants in the field. Those didn't take long. At this stage the pictorial is pretty bland but it will come alive as the paint goes on.
Stay tuned...
-dan

Wednesday, April 21, 2010

Coming together in a hurry

I scratched my head a bit as I approached this new project. I knew what I wanted to do, but as always there is more than one way to get anywhere if we think about it. I had plenty of 1" 30 lb Precision Board on hand... my stock of thicker sheets was dwindling rapidly. I decided the scroll and oval would be best cut from 1.5" stock. The inside layers would be efficient if cut from 1" sheets. This would also minimize the hand work needed to shape the dimensional, double sided mountain 'graphic'.
After the design was done and approved I imported the vectors into EnRoute and started building the 3D flies. There was only one really. The oval was created and the beveled lettering added. I used one of my texture bitmaps to add some character. The incised lettering on the scroll was simple. The in between layers were simple cutouts. There were four router files in all. Each would be routed twice to create a double sided sign.
Once the MultiCam had done it's magic it was time to do some assembly. I had cut the motorcycle graphics with my plasma cutter and welded up the steel work necessary to hold everything in place. Two layers were glued on the work table, the balance up on the pole. This sign would be far too heavy to handle by myself once it was all together. I marked and cut the slots in the center pieces for the simple structural steel frame.
The two layers were clamped securely then I lifted the glued piece up onto the scaffold and welded it to the post. I simply had to see how it looked all together. I welded the rest of the bracket in place. It was starting to work for me. It wasn't hard to imagine the finished sign now.
The next morning I added the other six layers to the sign, carefully aligning them and then used Coastal Enterprises glue PB Bond-240 (as always). The sign bulked up considerably as I added the parts suddenly becoming downright large! It was left to set up over night.
Next up is the start of the hand work... adding texture to the edges and sculpting the mountain. I'd be working on a scaffold from here on in as the sign was now five feet off the ground.
Stay tuned...

-dan

Tuesday, April 20, 2010

Routing, carving, sculpting, welding, fabricating, cutting, gluing, painting, gilding - all in one project!

We do lots of things in our shop. It comes with the territory. We have to be master of many trades. This next project involves a lot of fun things including design, cutting, welding, fabricating, routing, carving, sculpting, painting and gilding! It uses a whole bunch of Precision Board too.
A restaurant just a half block from our place needed a new sign. I came up with a design and the owners loved it - but... There's always a but. They asked that I also include a motorcycle in the design. It seems the owner loves to ride his bike on Vedder Mountain, so much they named the restaurant after it. I scratched my head for a classy way to include the bike... until I came up with the idea to include it on the bracket. The owners loved it!
Next it was time to get into the shop and get busy with all the tools and materials I love to use.
Stay tuned!
-dan

Friday, April 16, 2010

BLING!

Once the sign was finished I immediately moved it outside into the bright sunshine to photograph. The 23K gold leaf letters absolutely sparkled in an incredible fashion. In spite of being small in relation to the total sign they instantly became the focal point. The natural light played on the textured surfaces of the sign, the shadows adding even more dimension.
The little red plane, complete with pilot roared through the center in dramatic fashion. The sign will be a great centerpiece in our trade show display. The back of the sign is just as fun, detailed and interesting. In this view you can better see the sturdy steel rod that holds the plane firmly in place.
The sign another great example of how Precision Board helped us craft a sign that would have taken many times longer than with any other material. It was easy to work with both by hand and machine. Even though it was largely made by a state of the art, automated machine it still looks very much hand crafted. I look forward to having it as the centerpiece in our upcoming trade show. I have no doubt it will grab everyone's eye.
I could now cross one more project off my list. No worry though, I have plenty more of these type imaginative and fun projects still waiting...
-dan

REAL GOLD AT LAST!

Gilding is a job I enjoy a lot. The effect is absolute magic - even after many, many projects. Once the size has tacked up it's time to lay down some gold at last. It is important to gild the letters in the same order and at about the same speed as they were sized. Since the laying of the gold is faster it's a leisurely job I enjoy. Make sure there isn't a strong draft draft or a fan blowing when you do the gold. It is so thin it will blow around wasting it unnecessarily. Take a sheet of gold (still on the tissue paper) from the book and gently lay it into the size. Press it down gently, burnishing it by rubbing through the paper gently. Lift off the paper leaving the gold stuck to the sign. Move to a new section of the lettering and repeat.
The gold will be a little ragged and uneven but not to worry. Once you have finished a section take a large, very soft brush and go over the letters, gently knocking off the excess gold. The brush actually scratches the surface of the gold and these minute scratches make the gold catch the light and sparkle. The effect is dramatic and amazing. Tiny flakes of gold will fall like snow to the floor. Don't sweat it - how often to you get to throw gold to the wind! :)
The reality is that the gold isn't a big number in the scheme of things. This sign with all its lettering only used 32 sheets of gold. In the quantities I buy (by the box) it worked out to be only about $50 worth of gold in total. A second coat of paint on the lettering (if I had done it with paint instead of gold) would have cost the same or more if you include my labor at my shop rate. With the dollars we can fetch for gold leafing I make a lot more profit for less cost. The gold work also sets our work into a class of its own as so very few sign shops offer gilding these days.
Next installment I'll show the finished signs - sparking out in the sun...
-dan

Preparation for the gold

Gold is REALLY MAGICAL. Nothing is as bright or shines like real gold. We can charge a premium for this service - even though the reality is that it is relatively easy to do and not very expensive. Best of all is that few modern sign shops do gilding so we don't have to make it merely about price.
We buy our gold in sheets. They measure 3 3/8" square and are slightly bonded to sheets of tissue paper. This is called patent gold. Gold can also be bought loose but it is much harder to handle that way. There are 25 sheets of gold in a book, twenty books (500 sheets) in a box. I buy my gold by the box as it is a lot less expensive that way - especially if you include the cost of shipping it.
I use oil based size to fasten the gold to the signs surface. It comes in slow or fast determined by the time it takes to tack up or dry to the point you can lay the gold. The fast size can hold its tack for days after a half day wait. The fast size is ready in an hour or two at most. I like fast size for surface gilding as our shop tends to be dusty. The size looks like varnish and is clear. A thimble full was more than enough to do this project. A little goes a long way! We recycle plastic pudding cups for this type of job. Once we are done they are tossed and in that fashion I don't have to worry about using any solvents - except to clean my brush.
I brush the size on with a small brush. Because we routed the bevelled letters with a slight shoulder, raising them off the surface, they are pretty easy and fast to paint. Skill helps but isn't critical. A good, quality brush is critical however for a good job. I took my time and covered each letter well so there would be no holidays (missed spots) later.
Now comes the hard part... waiting for the size to tack up. How long we wait depends on the temperature, the humidity and if there is air movement. When its ready a knuckle dragged over the size will squeak. (do this on a test piece - not your finished work)
Next installment we'll get to the flashy part...
-dan

Thursday, April 15, 2010

Instant magic!

Paint always adds a whole bunch of magic in a big hurry. I had decided we would make the round starred frame look like it was cast in solid copper and bronze but well used for many years. To add more texture I first applied some Coastal Enterprises primer. I applied the FSC 88-WB primer on thick with a small brush, purposely leaving the brush stroked in a random pattern. The thick bodied primer doesn't flatten out as it dries and so the brush marks stay in place as it dries. For the final metallic finishes I like to use Modern Masters acrylic paints. They offer a host of brilliant metallic colors and the paint holds up very well outside in the weather. I especially like that we can apply it with a brush by hand. I put the gold on first - two coats. The copper color was next. The piece was extremely bright at this point but I'd tone it down shortly.
The first acrylic glaze I mixed up was a rich caramel color. It went on in a thick solid coat with a small brush and then I quickly wiped off most of it with a small soft towel. I had to work fast to keep a wet edge between areas as the piece was much to large to do in one go. After the first light colored glaze the textures already started to pop a little more already even though it was pretty subtle. Back it went under the fans to dry.
The last coat of glaze was a dark chocolate with a hint of metallic purple. I worked from top to bottom, while jumping quickly from back to front and side to side to minimize dry lines between segments. The work went quickly and the piece instantly came alive as I finished. The dark brown was the same color we had mixed for the plane over a year ago and visually united the plane with the frame through which it 'flew'. Everything suddenly made sense.
I'll let the piece dry in the warm studio overnight, then add the final finishing touch in the morning - 23K gold to the lettering. I'll take some pictures of the process and show just how easy this amazing process is.
Stay tuned...
-dan

Off the ground and flying!

The first two layers of Precision Board came off the MultiCam in a hurry because we had used a large diameter bit to route them. I glued these up over a simple welded steel frame and clamped them good. we used PB Bond 240 glue as always. By the time the second set of pieces came off the MultiCam the previous pieces were dry enough to add the new ones to the assembly.
The next morning everything was good and dry. The clamps came off and the fun began! First I gave the entire piece the once over with my air powered die grinder. I trimmed up the glue joints, textured the edges and added some extra character here and there making the sign look well used. It took less than 15 minutes and was well worth the effort.
Then I sawed the old stand off the model plane and drilled a new hole in the bottom. The 1/2" steel rod would come more out of the side of the plane instead of the bottom as it had previously. By lining it up with one of the balloon tires it became much less noticeable and not where one would expect it. The sign was coming along nicely already.
Next up was a little more subtle texture with the Coastal Enterprises primer and then some paint!
-dan

Wednesday, April 14, 2010

Making the idea 3D

I built the 3D files using EnRoute Pro software. To save routing time I decided to built each side of the sign in two layers of 1" thick 30 lb Precision Board. This would make the sign almost 4" thick when it was all glued together. The compass points layer was routed using only a 3/8" bit with a 90% overlap. This made the file run pretty quick.
While that file ran I created the second file. Because of the fine lettering I would use a small 1/8" ball nose bit to route this piece. Because it had a much smaller area than the first piece a small bit didn't take too long to route.
While the MultiCam was busy I cut the steel and welded up a stand, pole, and an interior frame around which I would laminate the pieces.
Stay tuned for the next installment...
-dan

Da plane boss... da plane!

We all have projects that seem to continually get pushed back as life simply gets too busy. I'm no different. I had built a couple small plane models using EnRoute and our MultiCam a little more than a year ago. One of the planes was given to a friend of mine from Texas who had attended one of our Sign Magic Workshops. The other was earmarked for a sample sign for our shop. It sat on the shelf ever since. A couple of days ago I finally got the idea I would use for the sign.
I remembered watching a crop duster working when I was traveling a few years ago. I remember being very impressed as I watched the pilot lay down his load with incredible skill, whipping the plane back and forth across that short field. This little sign would honor him and others who do that type of work. I brought my laptop into the house and as we watched our favorite TV show I built the vector file during the commercials. I called the fictitious business 'DUSTY'S FLYING SERVICE - SINCE 1954' (I was born in '54) :)
Yesterday morning when I came into the shop I kicked our MultiCam into warm up mode. As it went through that 15 minute cycle I built the 3D file for this sign in EnRoute. I'll walk you through that process next installment...
-dan

Monday, April 12, 2010

The finish line!

The sculpting process took less than two hours. With all the shapes accurately defined by the Precision Board the layer of epoxy sculpt was thin. Then we applied a coat of Coastal Enterprises FSC-88 WB primer to the entire sign. On the letters we applied the primer extra thick using a small brush to purposely add a little more texture. Because it is so heavy bodied it doesn't flatten out as it dries making for the perfect texture for the final paint.
The car got four coats of a lime green metallic paint - applied by hand with a brush. Some black paint on the wheels, grill and upholstery were next. Then a little silver metallic added the necessary bling to the little hot rod.
While each of those many coats of paint dried we gave the sign base and background the same treatment with similar acrylic paints. By using our router to create different levels for each of the painted areas the sign was fast and easy to paint.
Once everything was done we put the pieces together. The bright colors were balanced by the more subtle greys and blacks. It all made sense.
Although only measuring 26" wide x 24" tall x 10" deep the sign is sure to be noticed by all the car enthusiasts who walk by.

-dan

Off to the races...

With our entry to the car show looming I needed to get busy once more to create another piece for our display that would appeal to this crowd. I decided a little hot rod convertible was just the ticket. I whipped up a quick sketch to get my thoughts in order.
Then it was on to EnRoute Pro to build the routing files. Since I wanted to hand sculpt the car I decided to simply cut out car shaped blocks of Precision Board using our MultiCam router. The wheels were built as detailed 3D files for the machine since it could do a much better job in minutes than I could in hours by hand.
The waving flag background and sign face were created in EnRoute and machined in detail on the MultiCam. The flag wad done using bitmaps with a vector outline. The sign was done inside EnRoute by creating reliefs and beveled letters. The whole design process went pretty quick.
Once the MultiCam was done I glued up the pieces and left it in the clamps for night. In the morning it only took a few minutes to quickly do a rough shaping of the car fenders, hood and trunk to get it ready for the sculpting process. While I was at it I used my trusty die grinder to add texture to the sides. top and bottom of the sign base.
Since it is so easy to work, Precision Board allowed me to carve the shapes very rapidly, both by running the machine as fast as it could go and also in my hand tooling. I can count on the 30 lb board remaining very stable to hold both the sculpting epoxy and the paint which came next.
Stay tuned...

-dan

Thursday, April 8, 2010

Another satisfied customer.

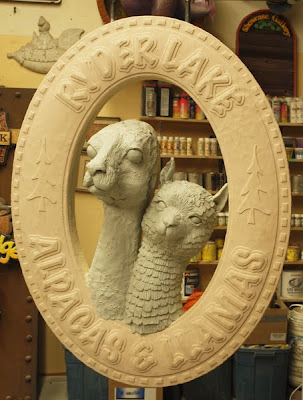
The sculpt went fairly quickly with the bulk of it being done in two days. One the epoxy had cured we primed the sign with Coastal Enterprises' FSC-88 WB primer. Then we painted on the base colors and added layer after layer of glaze building up the colors on the animals.
We put the last of the colors on the sign yesterday, then called the client this morning, letting them know it was ready for them to approve. They excitedly showed up this afternoon, delighted with their new sign. Our client will get the site ready, and install the foundation before we make the delivery.

The llama and alpaca will live in our shop a few more days before they leave.

-dan

Wednesday, April 7, 2010

A fun farm sign!

A dimensional sign to us is so much more than a flat piece of board with a creative hole blasted or routed into it. Shape means more than just the outline of a sign. I believe signs need to tell a story and so often the story just can't be told in a conventional way. This customer needed a sign and loved the signs we display put on the road. She wanted one like them for their farm. She came armed with a drawing her sister had done. Although basic, it was a good jumping off point. My client also came armed with good reference photos of the unusual animals.
I created the vectors in Illustrator and then combined those shapes with the sketch my client had provided in Photoshop, adding in the textures, shading and bevels to give my client a pretty good idea of what the sign would look like when it was done. Once approved it was simply a matter of importing the vectors into EnRoute and then building the reliefs to create the routing files.
The top layer of the sign was routed from 1.5" 30 lb Precision Board. I then cut out two more layers of 1" Precision Board to laminate behind this to give me the depth and structural strength I needed to hold the sculpture. This was laminated up with a welded steel frame inside to give it strength complete with two bars sticking out of the top and one out of the side to weld to the pole and crossbar. I added a quick plasma cut steel tree to the top of the pole to mirror the tree image I used in the sign.
Once everything was secure I put the pole on a temporary stand and set to work on the sculpture. Precision Board scraps were used to build up the basic sculpture, then I roughed out a quick layer of epoxy sculpt to mock up the shape. The second coat would add in the detail.
It was looking pretty good in only a few hours of sculpting. Stay tuned for more progress next installment...

-dan

Monday, April 5, 2010

Helping hands!

Our business could definitely be defined as a family business. We live on a small acreage in a small town. Janis & I have co-owned the business for decades. Our shop is out back, behind the house and our daughter works for us part time. We've employed many other members of our family through the years, including our son Peter, son-in-law Phoenix, various nephews and nieces, cousins, my brother, and many other folks who have been a member of our family while in our employ.

Now we have a grand daughter Phoebe who desperately wants to carry on the tradition. She has spent countless hours in my studio and shop over the last five years. When she was first born she would stay in my studio, often sleeping in my arms while I worked at my desk. As she became more mobile her toys littered my studio. She learned to draw on my knee. Now five, Phoebe loves to spend time in the shop. Her playhouse lives there, on wheels so it can be pushed out of the way when we need the space. She is learning about tools and how to handle them. Her favorite job is painting and when she is wearing her paint clothes she is allowed to help.
Today was such a day. She had a day off kindergarten and she got to spend all day with grampa in the shop. She kept busy in the morning painting various projects of her own including some fancy new designs on her playhouse. But she was constantly looking over her shoulder at my projects for they looked far more interesting. After lunch I let her help. I had saved some shorter signs just for that occasion. Since I was the taller person we decided it best if I painted the top portions of the sign. She would handle the lower parts. We had a grand time working together!

-dan

Sunday, April 4, 2010

A little hand work and I'm done!

One of the things I love about Precision Board is that it tools just as well by hand as it does on the CNC machine or other power tools. In this case I wanted the wrench to look like the ones in my tool box - slightly worn and used with bits of grease and dirt lodged in the crevices. IOnce the glue had dried I used my air powered die grinder to clean up the seam lines between the two pieces. Then I eased the edges a little and added some dents and dings. If I'm wedged under a car and need a hammer or small pry bar I won't necessarily crawl back out and go get them. My wrenches have worked just fine in a pinch and they bear the scars to prove it.
Then I laid on a coat of Coastal Enterprises FSC-88 WB primer. I put on a heavy coat, but with a small brush, purposely leaving in brush strokes to add a little more texture. I put a fan on the piece for an hour as per directions and then when it was good and dry I added two coats of silver metallic paint. Once they were dry I slopped on the glazes wiping the wrench down well afterwards - except for in the cracks and folds of the metal. I started with a mid brown, then later added a dark chocolate/grey. I instantly had my used wrench looking like it came straight from the toolbox. It was a cool little sign without a whole lots of time invested - about four hours work from start to finish including machine time.

-dan

Friday, April 2, 2010

Throwing a wrench in it...

I needed a new display piece or two for an up coming car show we will be showing our signs in. It is a brand new market for us but it could be pretty good. We will of course bring our little sidewalk sign/truck to the show and it is bound to be a hit. The signs in the back were made on the router with 30 lb Precision Board. The truck was sculpted with epoxy over a welded steel frame.
The reality however is that not everyone can afford (or wants) a large piece like this. I needed some smaller pieces to catch potential buyer's eyes. I figured most folks who work on cars have a shop. It's a personal space that needs a sign to identify it as their very own. I didn't have to look any further than my own toolbox for inspiration. I grabbed a wrench form the drawer and quickly whipped up a vector file - adding my own name instead of the real brand that was on my tools.
It only took a few minutes to create the reliefs in EnRoute, tool path it and send it to the MultiCam. I threw a part sheet of 1.5" thick 30 lb Precision Board on the table and set the machine in motion. Then I went to do other chores.
In less than an hour the router was done. I had two halves of a large wrench ready for gluing. I spread on a thin coat of PB Bond 240 glue, misted with water and clamped things up. I'll be back tomorrow with the continuation of this story...

-dan